Get Ready...
Note! We strongly recommend working through these instructions on a Windows PC, Mac PC, Chromebook, iPad, or Android tablet. You will need to switch between two browser tabs, and these instructions are optimized for those devices.
Please select your device type:

Get Set...
Don't worry! Setting up your POMAlarm Gateway Hub and Detector Puck is a painless process, and we will walk you carefully through each step.
The steps we will go through are:
- Connecting This Device to Your Gateway Hub WiFi
- Connecting Your Gateway Hub to your Home/Office WiFi
- Reconnecting This Device to Your Home/Office WiFi
- Registering Your POMAlarm Gateway Hub
- Registering Your POMAlarm Detector Puck(s)
- Setting Up Your Contact List
- Adjusting Your Detector Sensitivity Level(s) (Optional)
- Setting Up Your Quiet Time Rules (Optional)

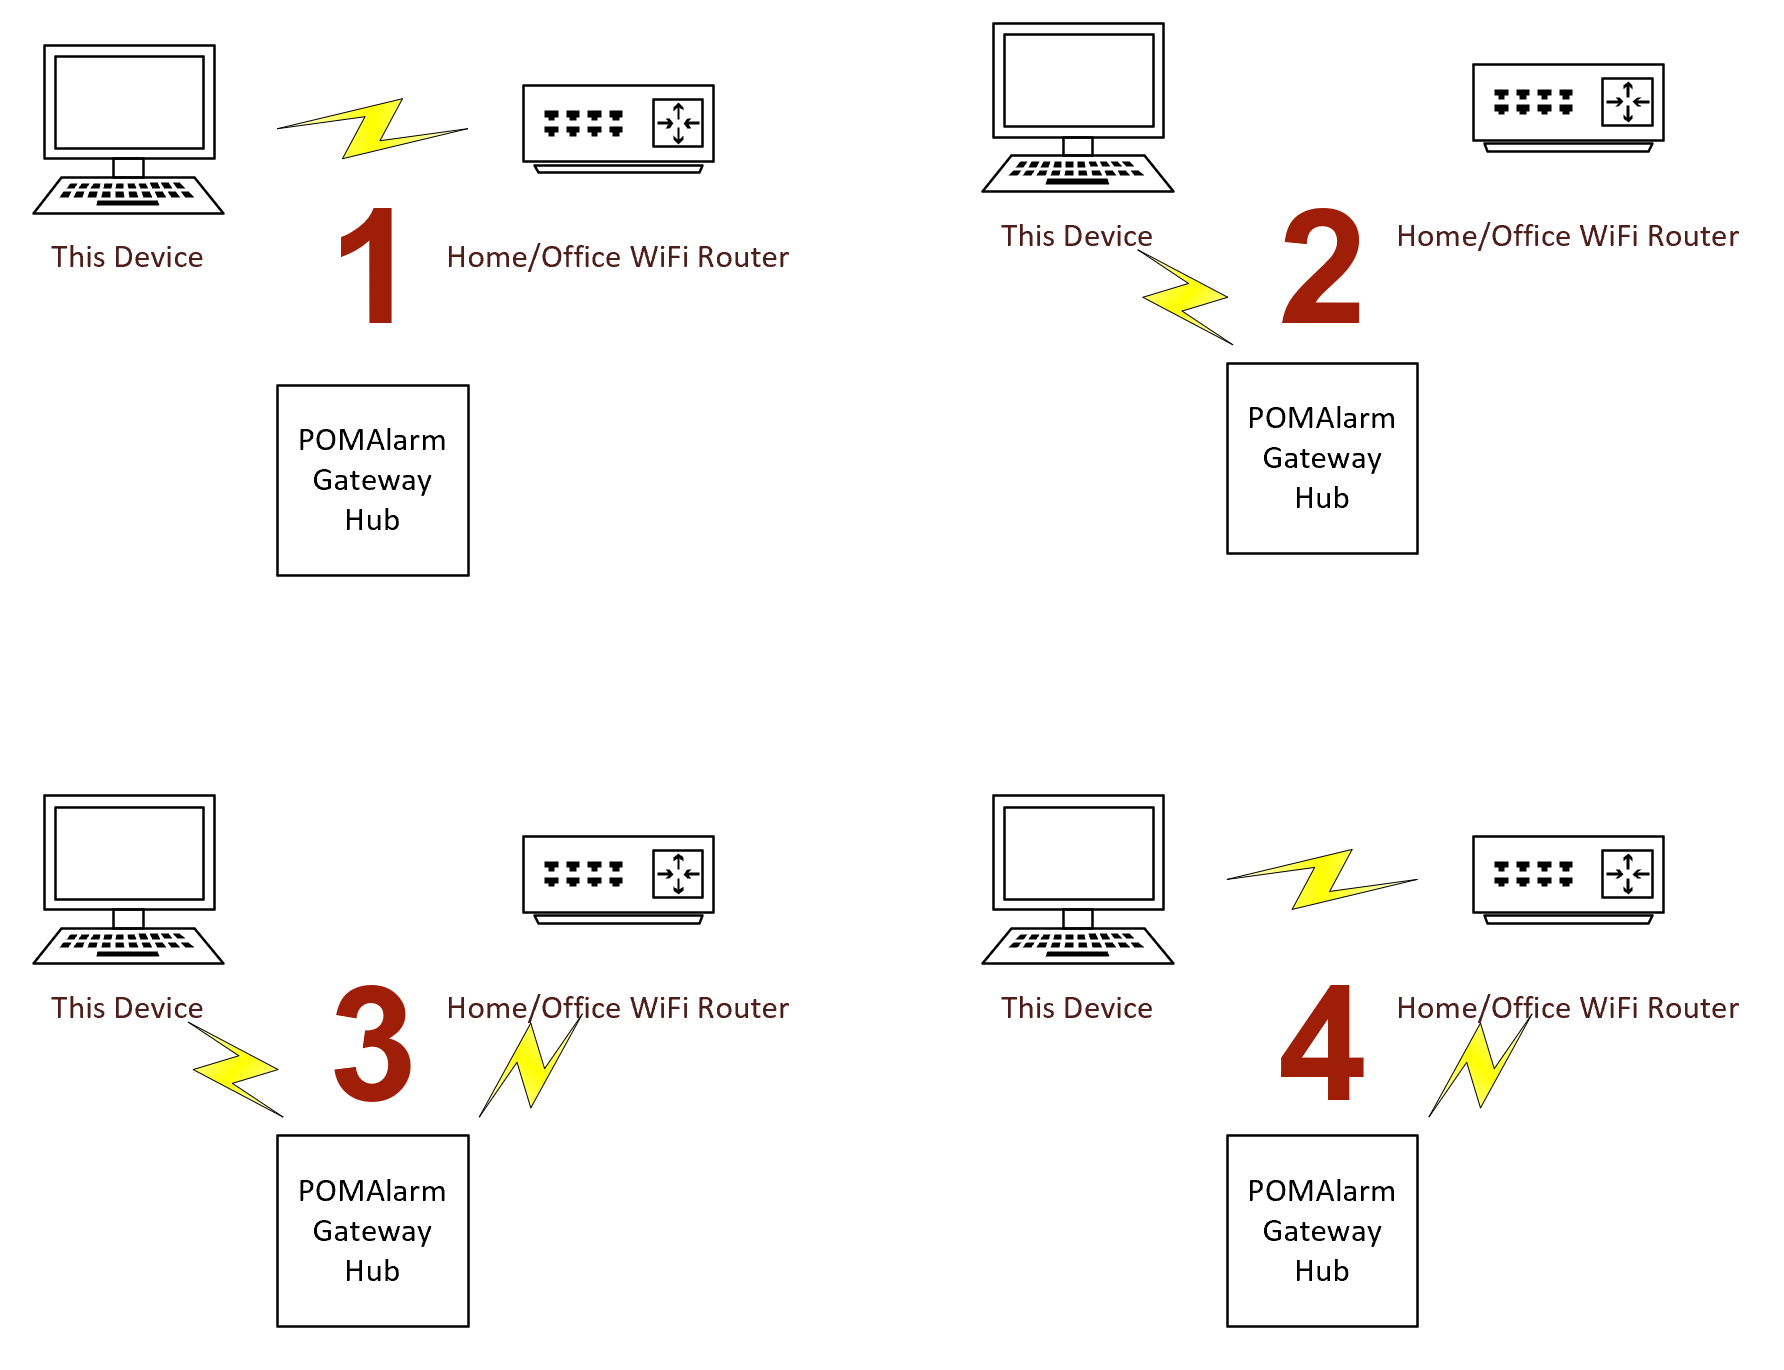
Connecting This Device to Your Hub WiFi
In order for your gateway hub to communicate with the POMAlarm servers, you will need to set it up on your home or office WiFi network.
To facilitate this, the Hub comes out of the box with it's own WiFi network.
You will need to temporarily connect this device to the Hub's WiFi network, in order to pass the Hub the network name and password to your home/office network. Once that is completed, the Hub will turn off its own network and reconnect to your home/office WiFi. You may then reconnect this device back onto your home/office WiFi.
Before we begin, you will need:
- Your home/office WiFi name (SSID)
- Your home/office WiFi password
NOTE: The Hub connects to 2.4GHz WiFi networks only. If you have separate 2.4GHz and 5GHz WiFi networks in your home/office, please record the information for the 2.4GHz network.
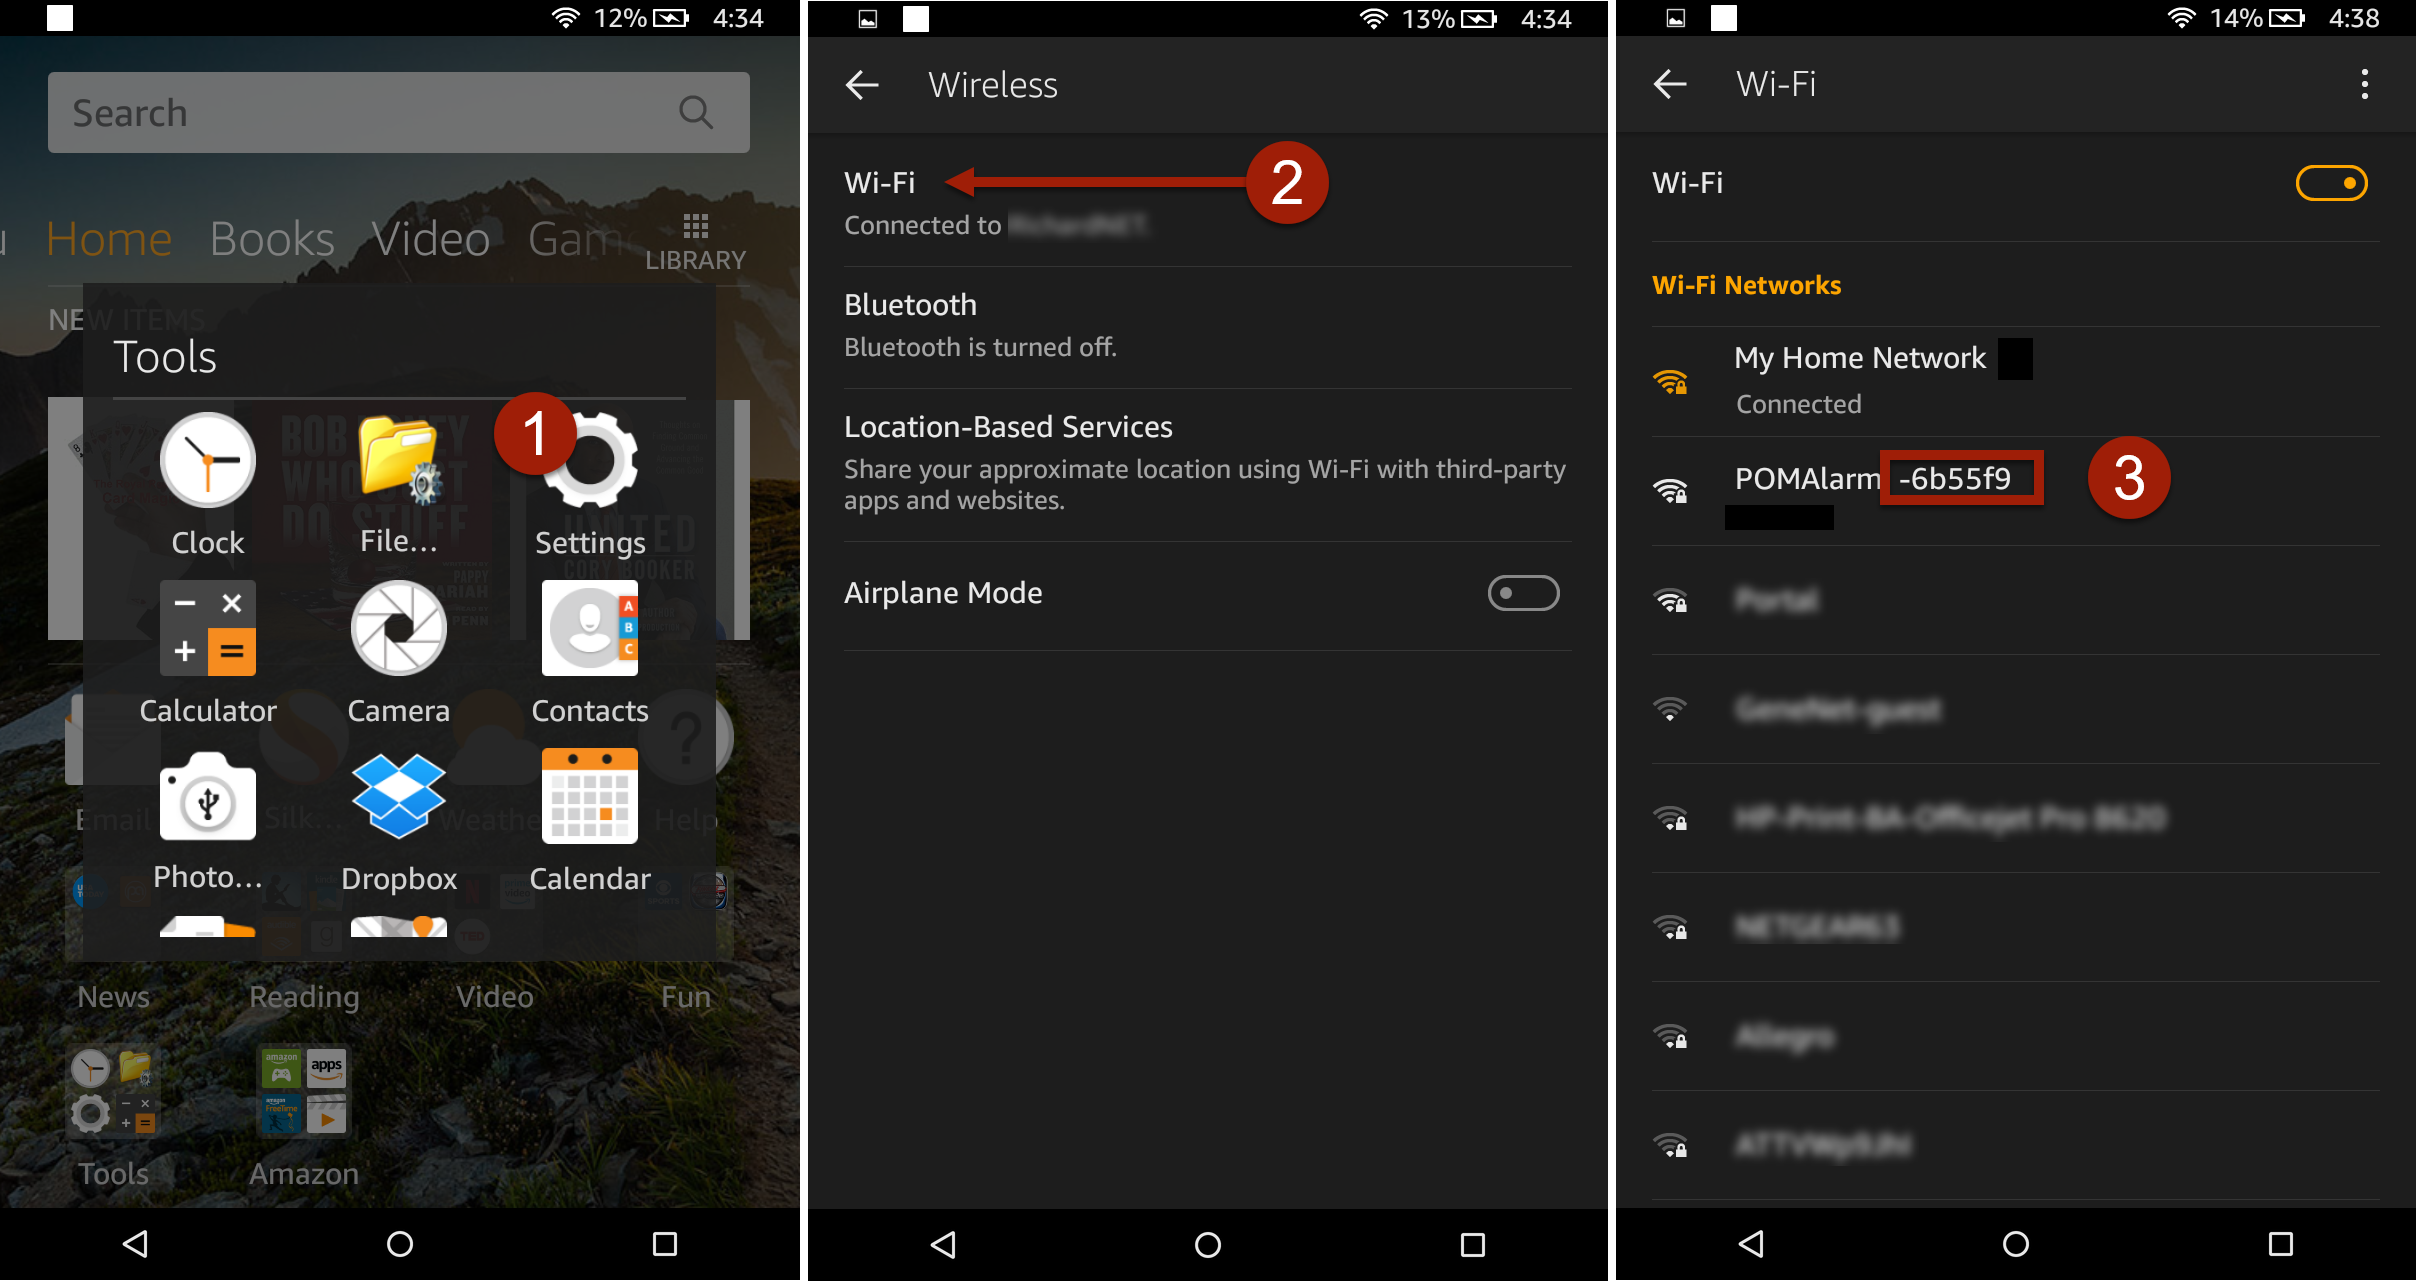
Connecting This Device to Your Hub WiFi (2)
Connect this device to your Gateway Hub's WiFi network.
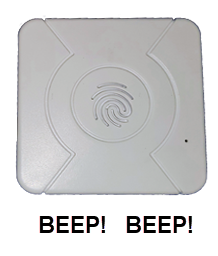
- Plug in the Gateway Hub to a wall outlet using the power cord provided. You will hear three quick beeps, then two quick beeps
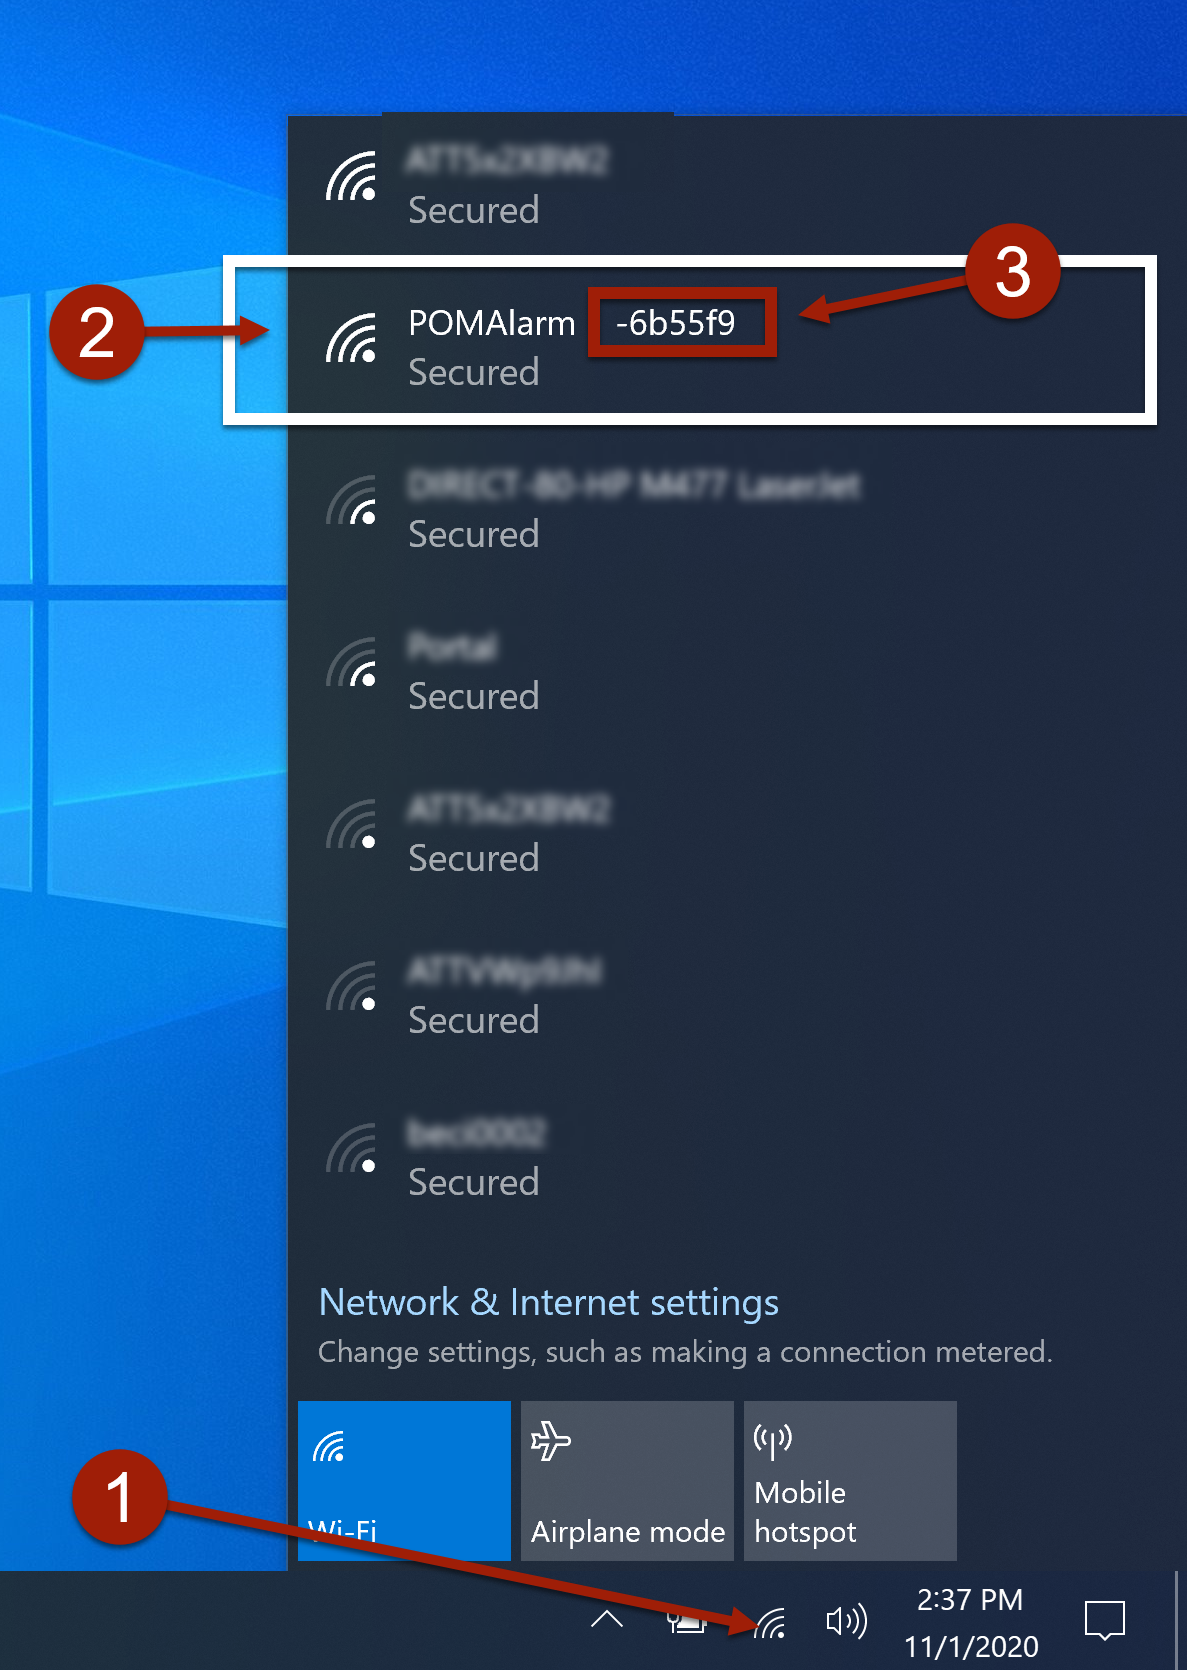
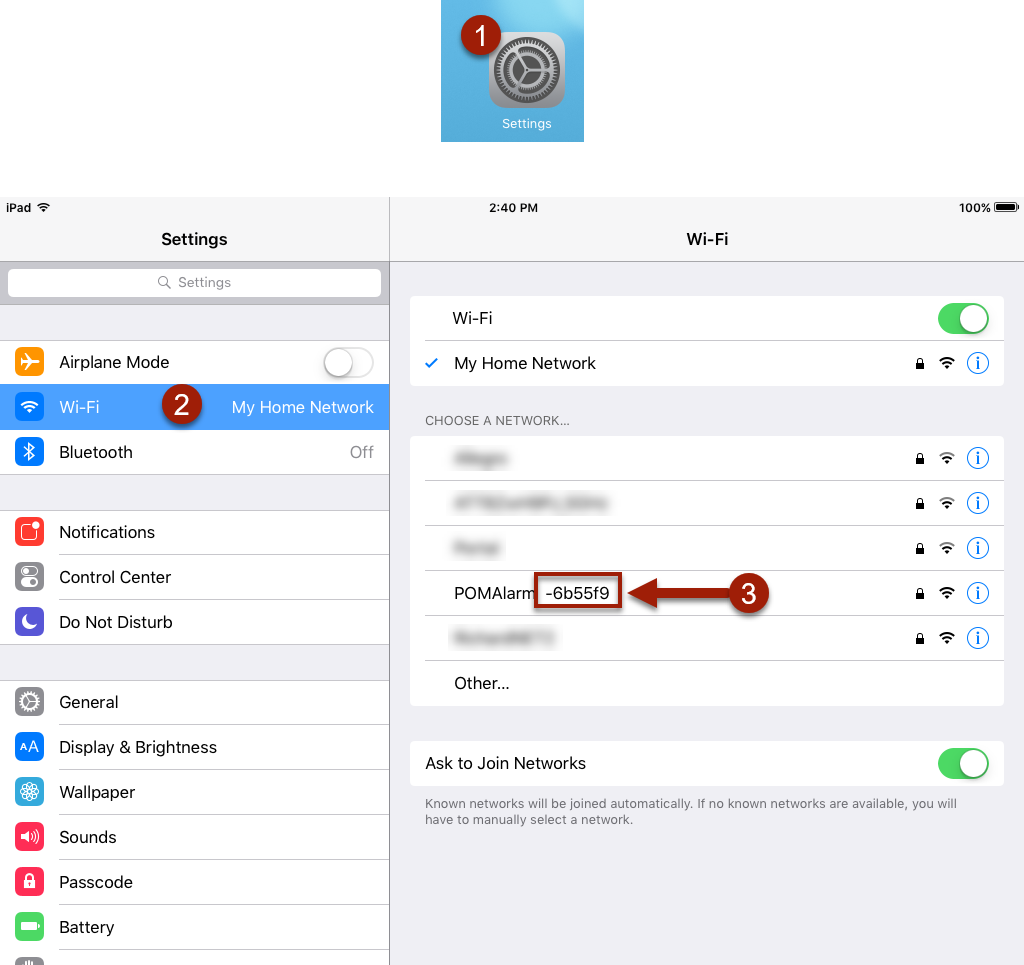
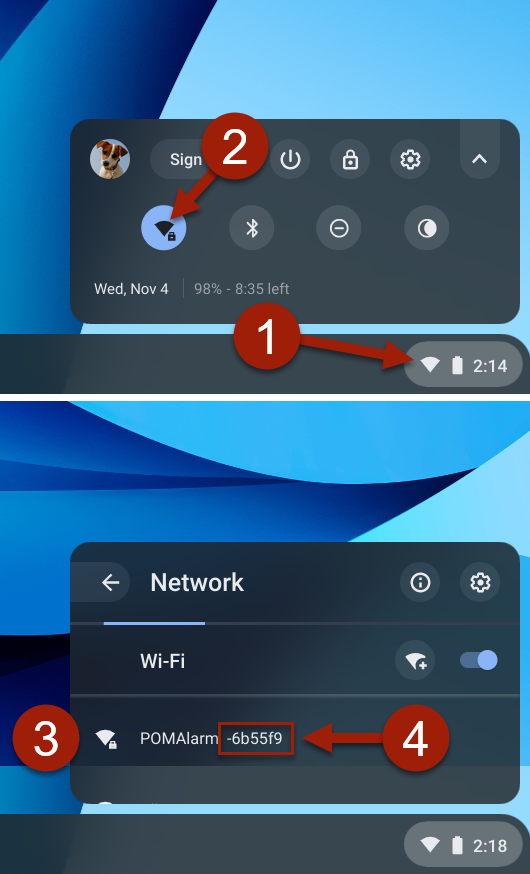
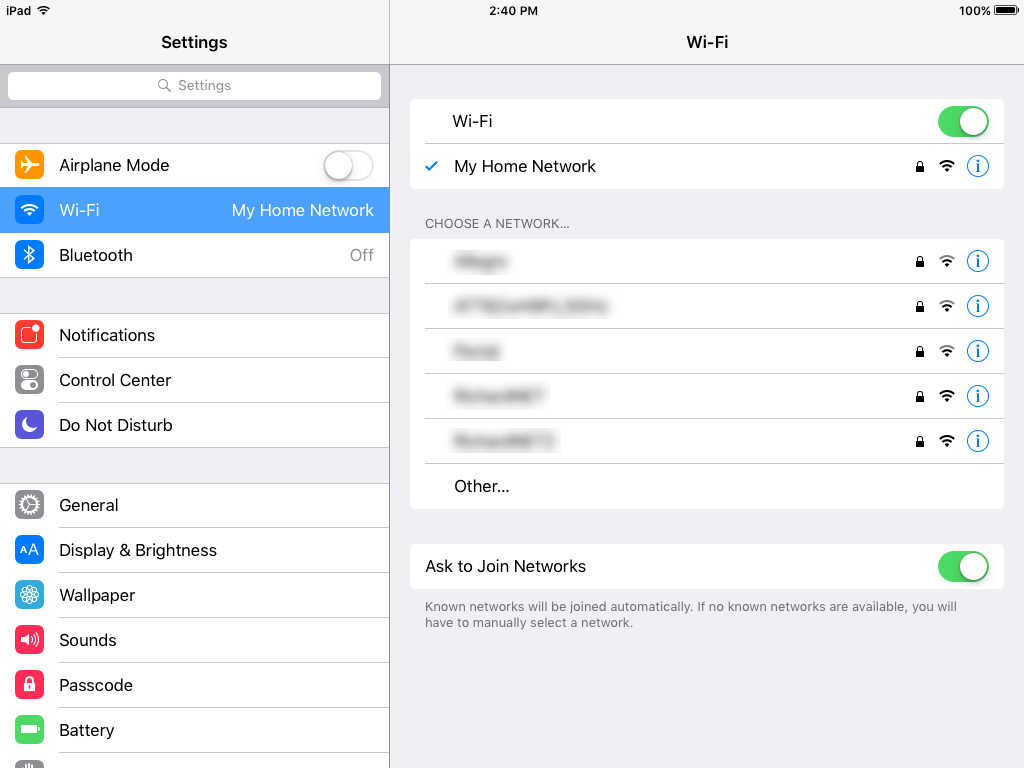
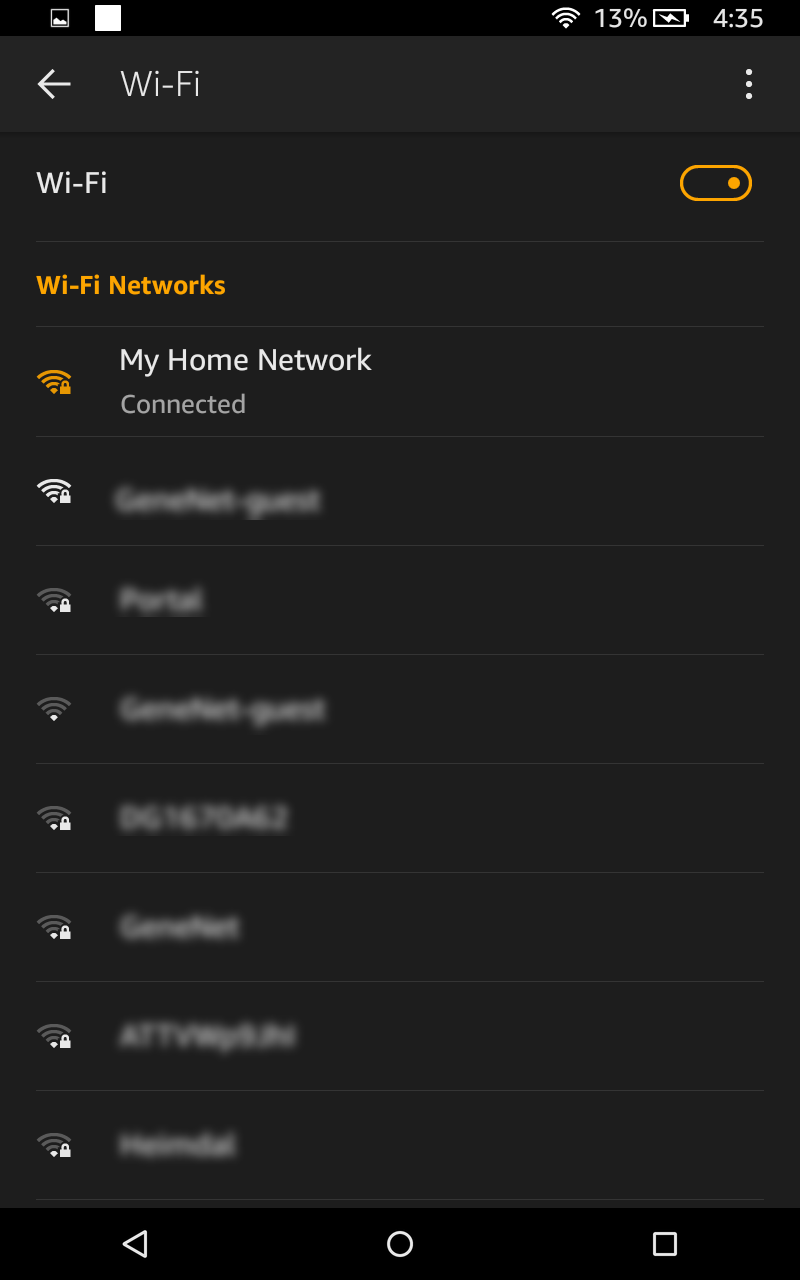
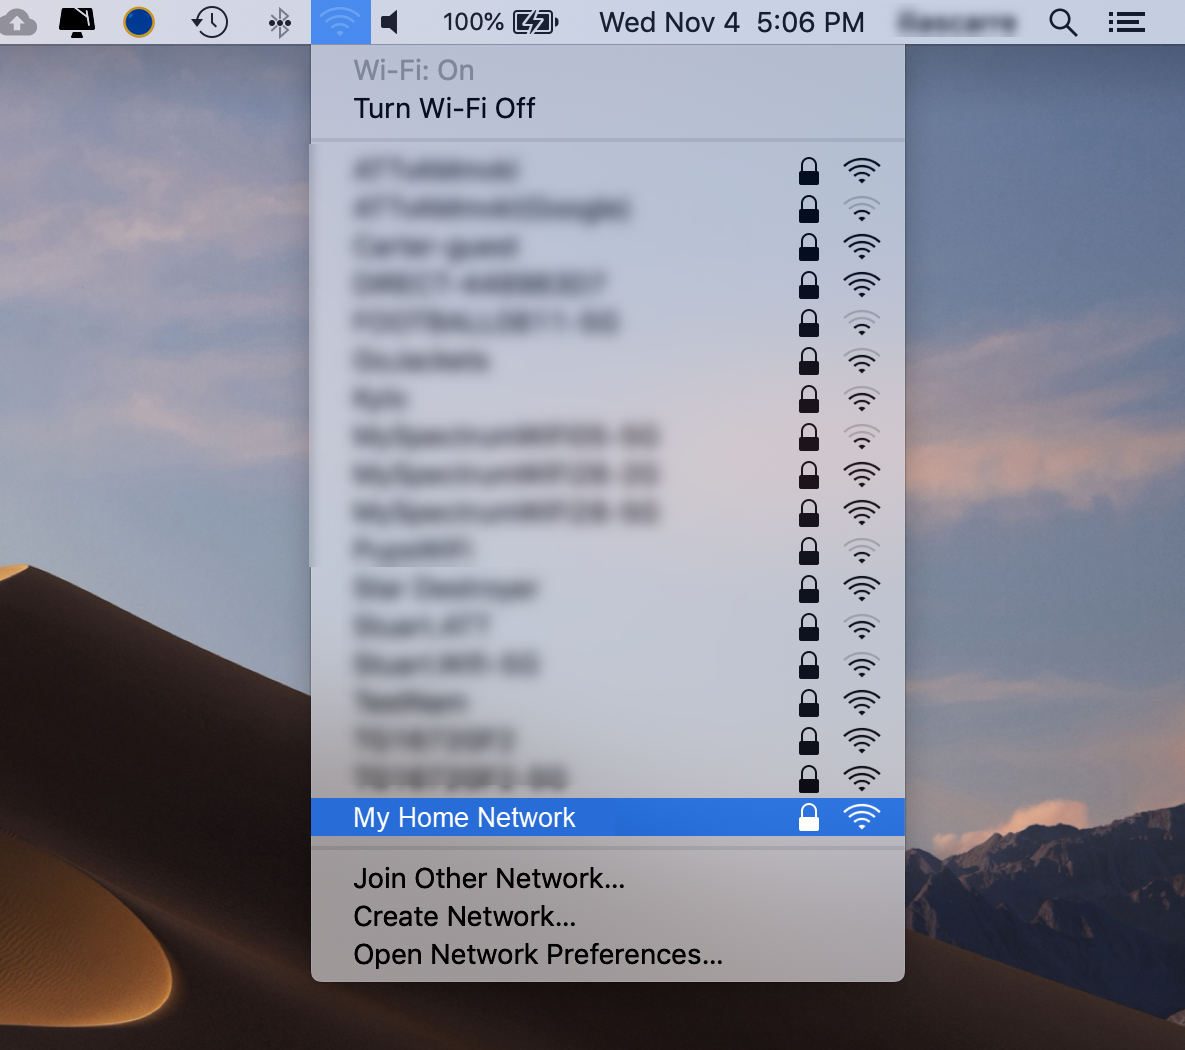
- Go to your WiFi settings on this device.
- You will find a new WiFi network "POMAlarm -xxxxxx" where the x's represent the Gateway Hub serial number.
(Numbers are 0-9 and letters are A-F. There are no letters I, L or O in the serial number.)
Enter the serial number here. You will need it later!
Connecting This Device to Your Hub WiFi (3)
Note that you will lose internet access once you switch to the Gateway's Hub's WiFi. However, these instructions will continue to work. You will regain internet access when we switch this device back to using your home/office WiFi.
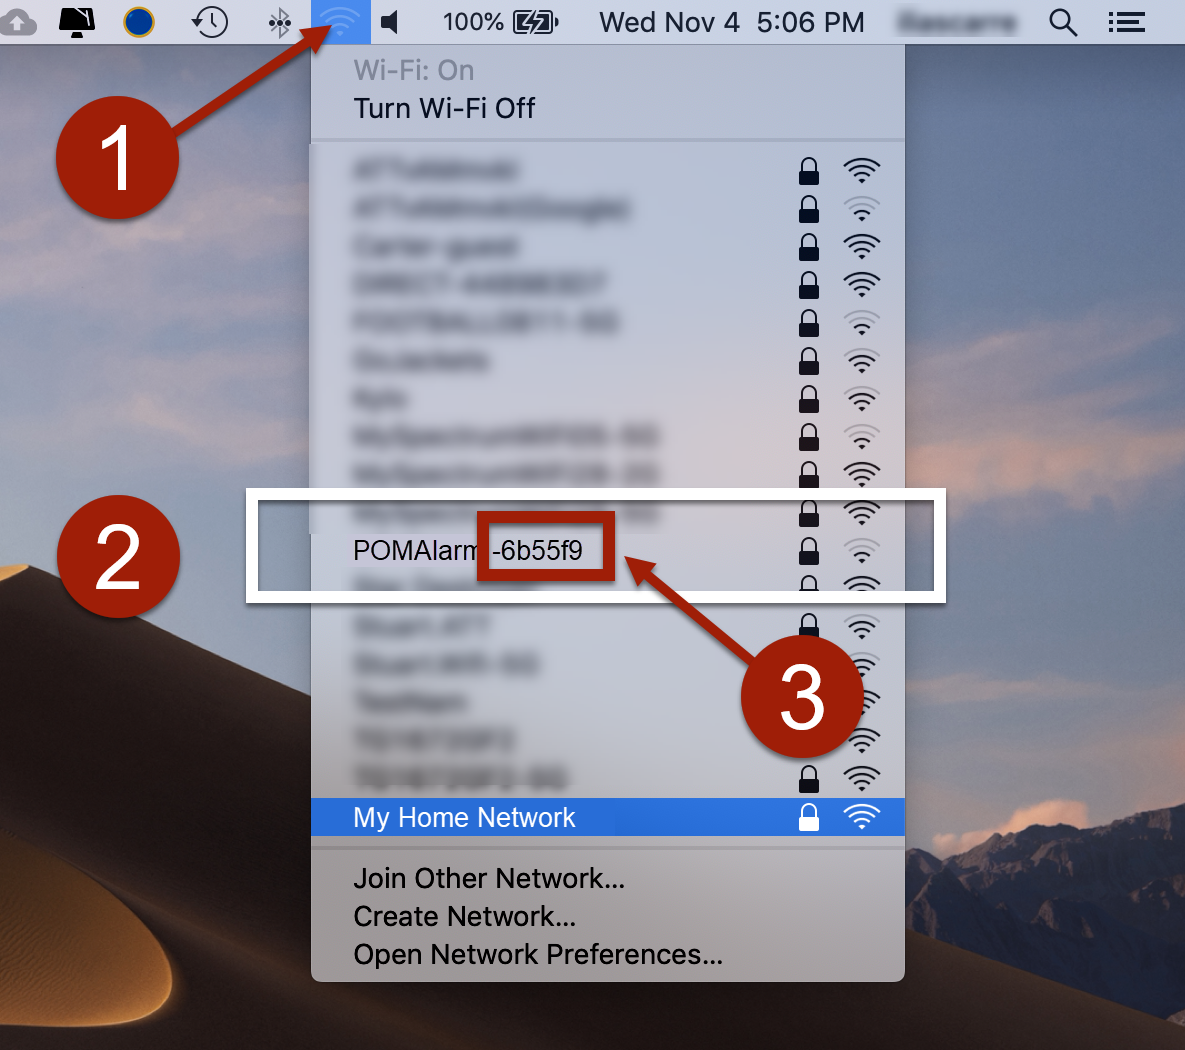
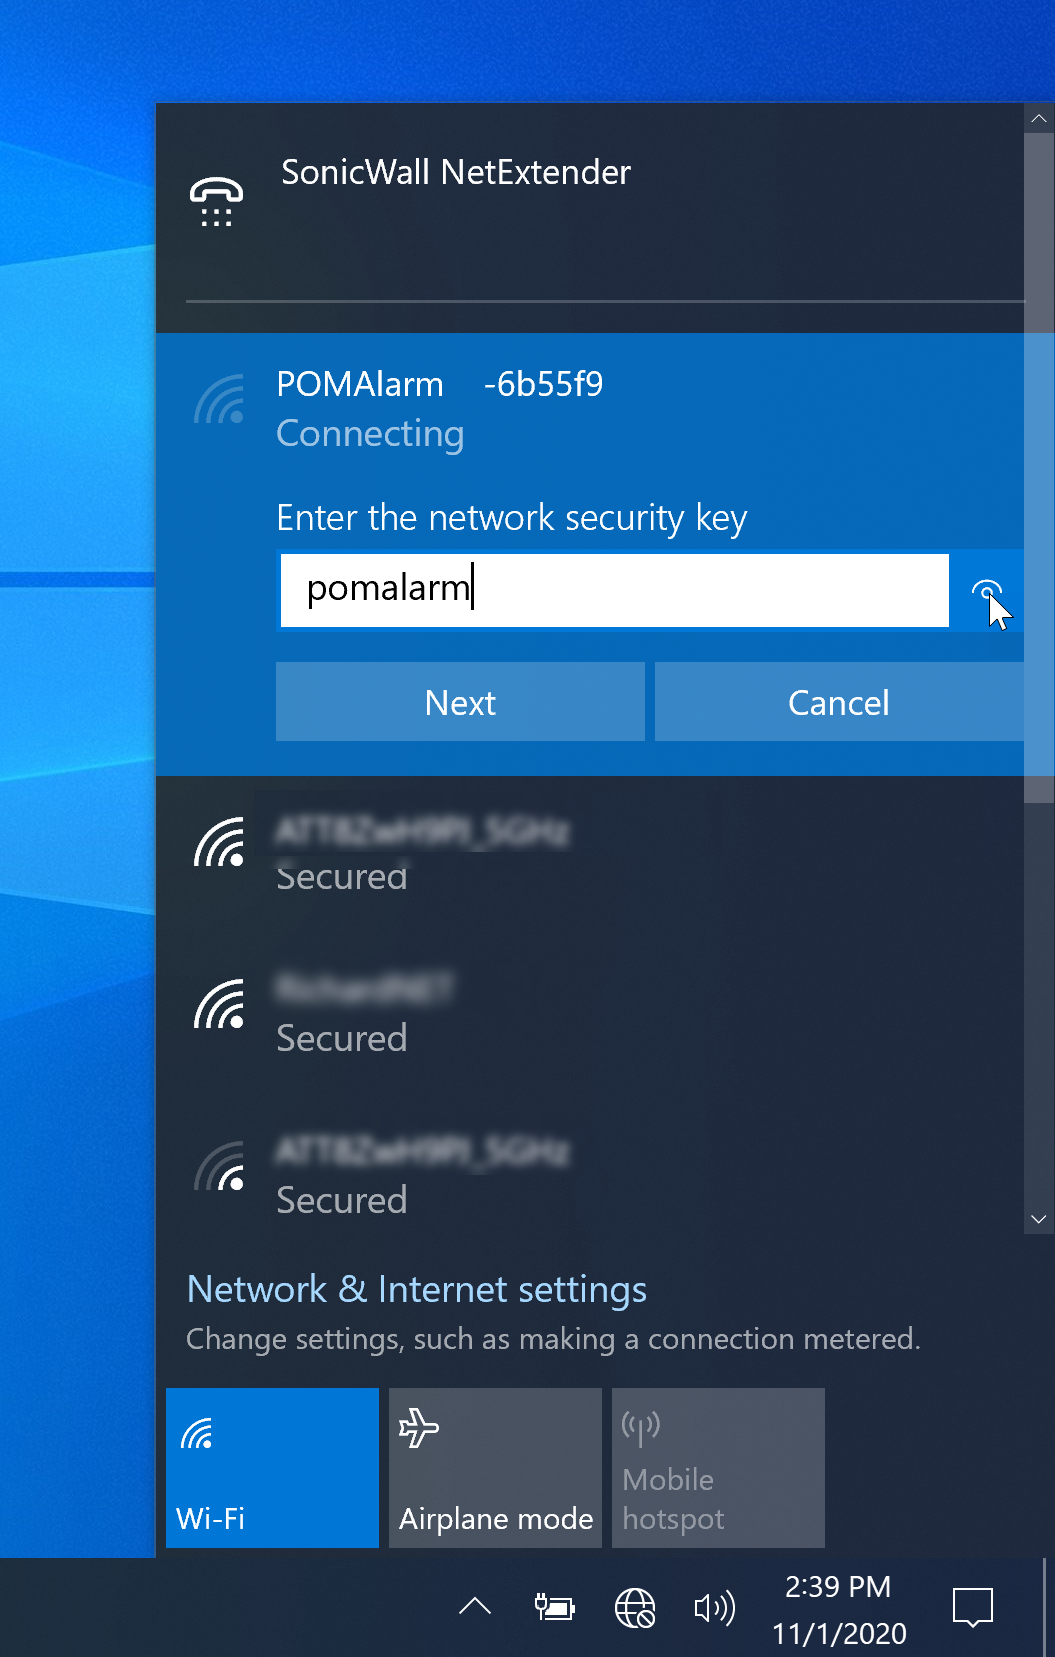
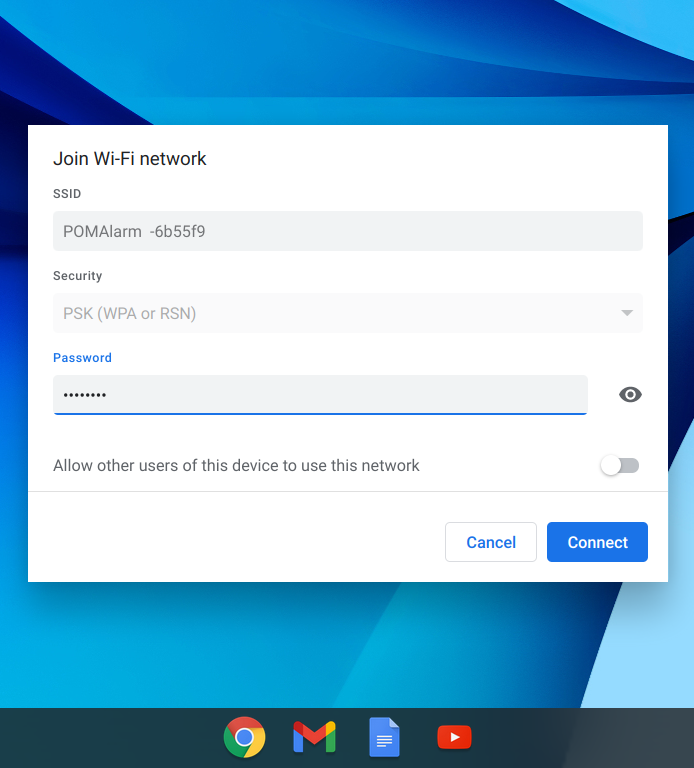
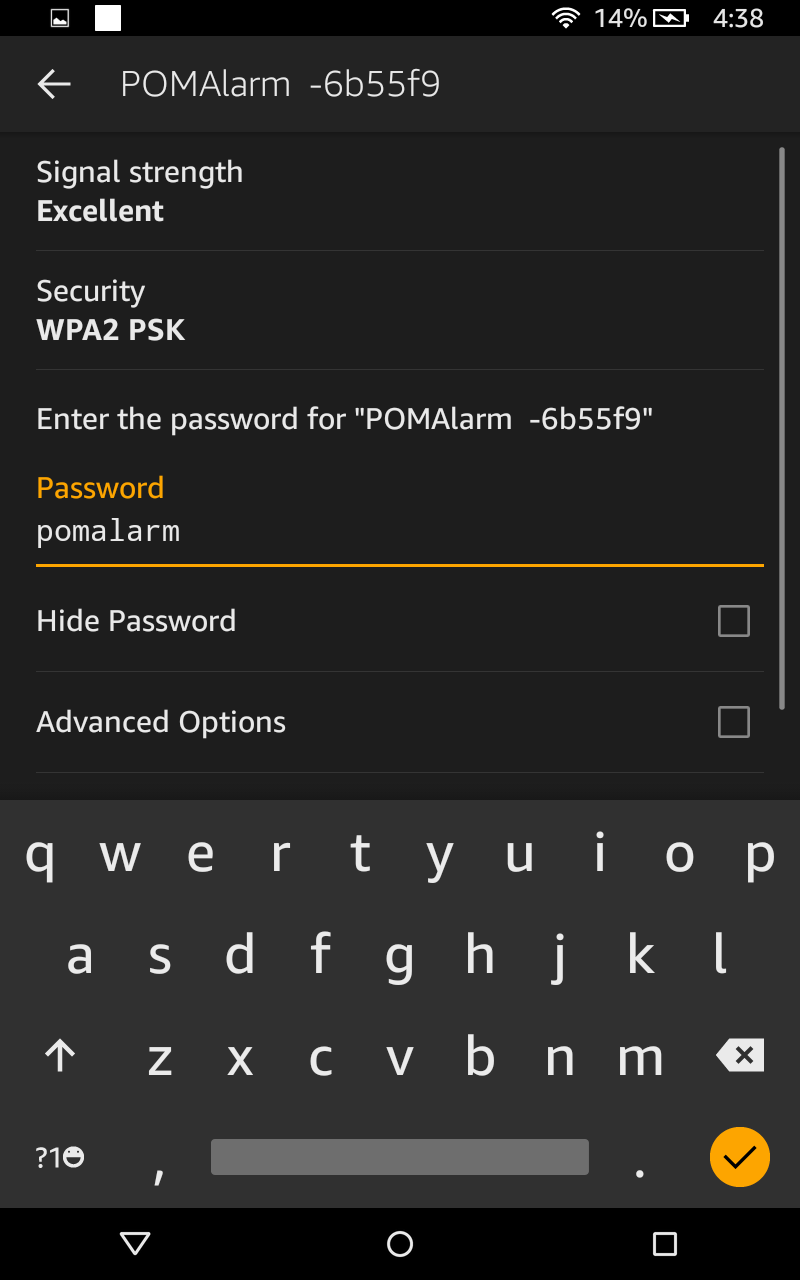
- Select the POMAlarm network.
- After a short delay it will ask for a password. Type pomalarm in the box.
- Click the "Connect" button.
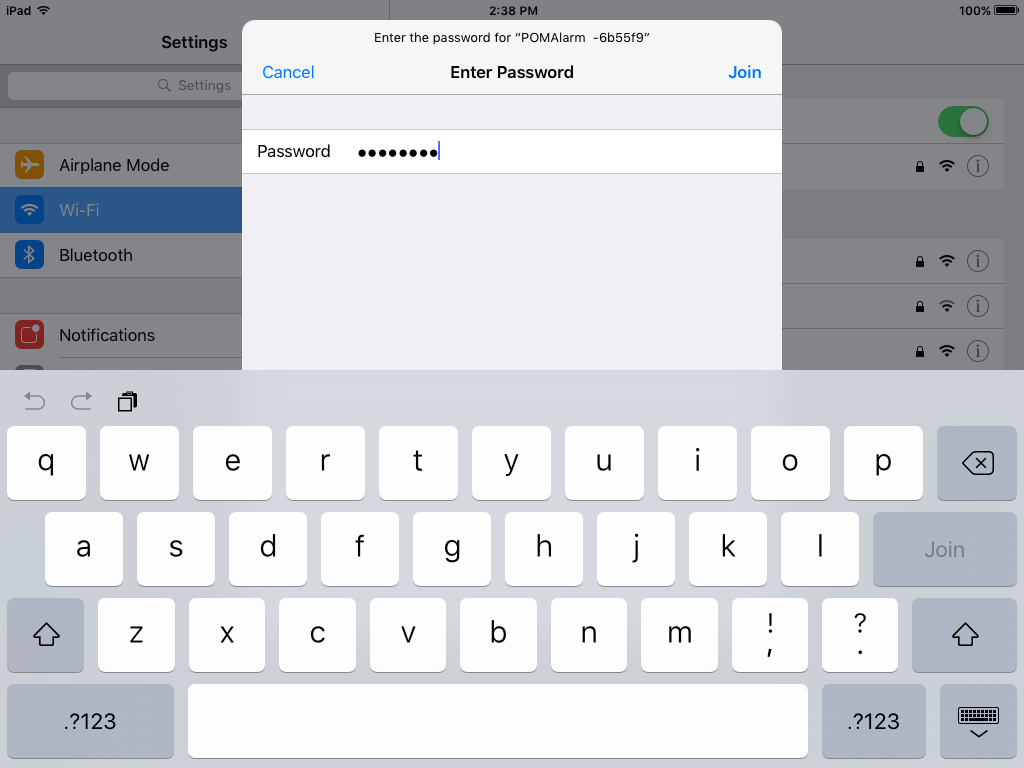
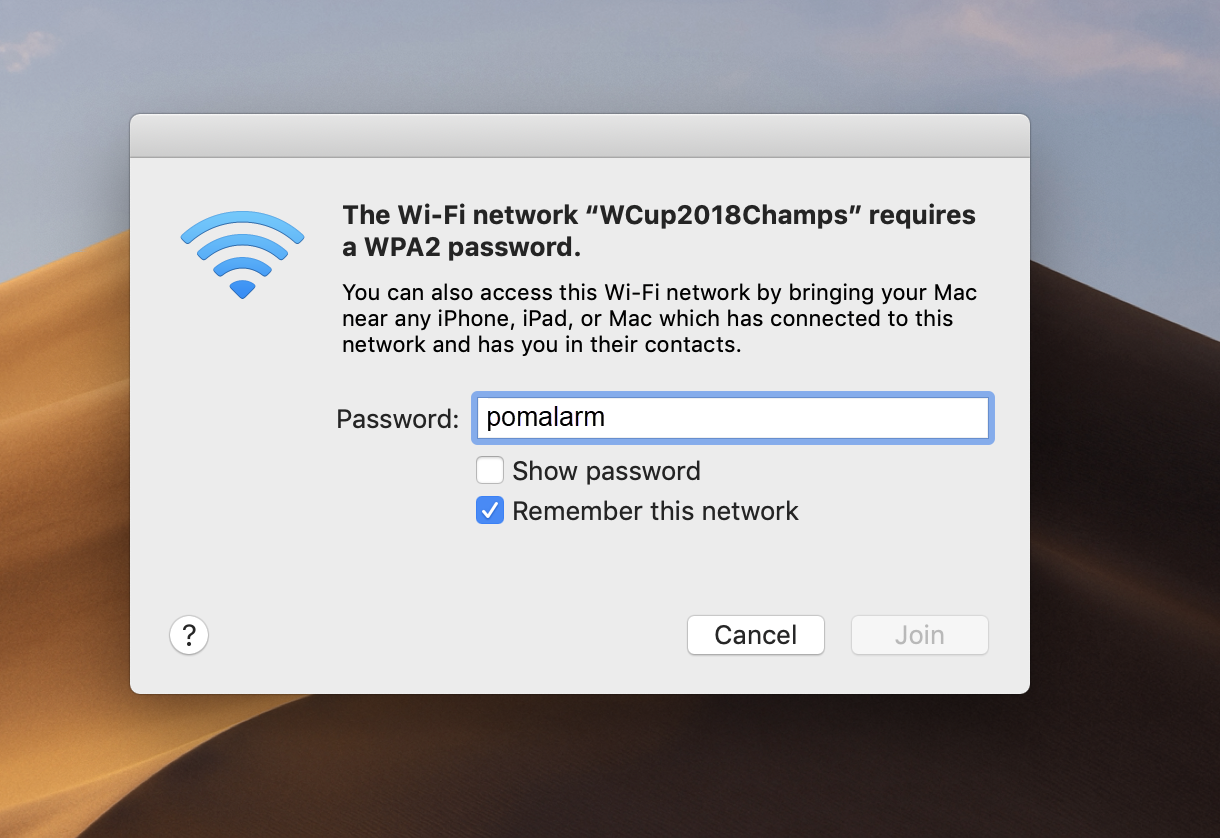
- Select the POMAlarm network.
- After a short delay it will ask for a password. Type pomalarm in the box.
- Click the "Join" button.
Connecting Your Hub to Your Home/Office WiFi
Now that you are connected to its WiFi network, you can add the Gateway Hub your home/office network by accessing the Hub's built-in settings screen:
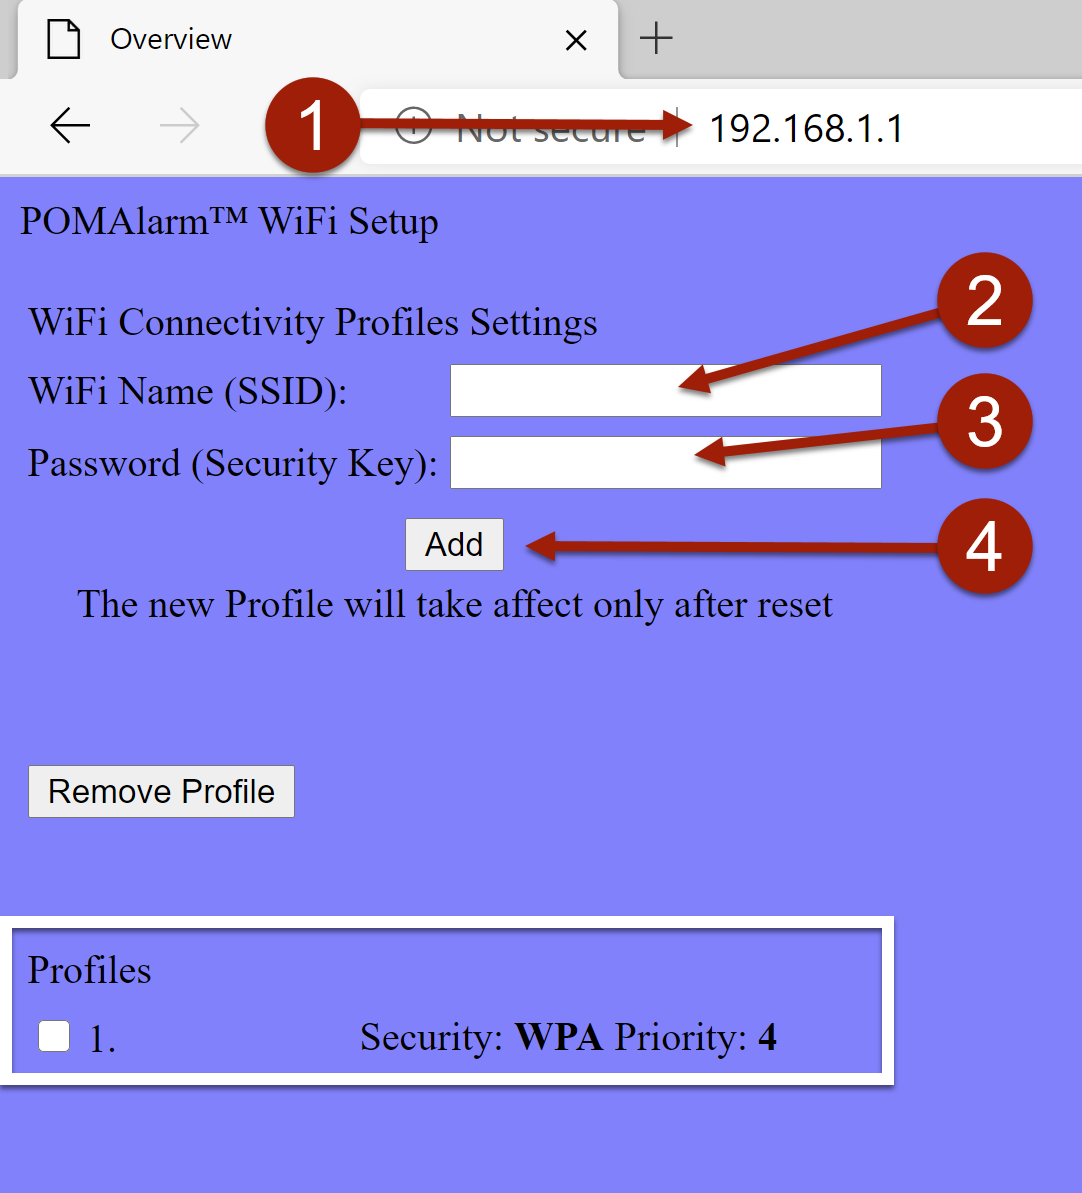
- Click on this link: http://192.168.1.1 or type the address into your web browser. The blue setup screen will appear.
If there is a delay in connecting to the POMAlarm WiFi and your screen shows a “404 ERROR” you will have to go back to your WiFi settings and connect to the POMAlarm WiFi option again. (This step is time sensitive.) - In the "WiFi Name (SSID)" field, type in your home WiFi network name.
- In the "Password (Security Key)" field, type in your home WiFi network password.
- Click the ADD button. The web form will confirm your entries.
Connecting Your Hub to Your Home/Office WiFi (2)
We need to restart the Gateway Hub so that it will begin using your home/office WiFi and connect to the POMAlarm servers via the internet.
- Restart the Gateway Hub by unplugging it, waiting a few seconds, and reinserting the power cable.
- After about 30 seconds, the Gateway Hub will connect itself to your WiFi network.
- Once successful, the Hub will emit two beeps, indicating that the Hub is communicating with the POMAlarm servers over the internet for the first time.
- The Hub will continue to emit two beeps periodically, until it is registered with the POMAlarm servers.
If you hear three long beeps instead of two short ones, please go to the troubleshooting section at the end of these intructions.
Reconnecting This Device to Your Home/Office WiFi
Reselect you home/office WiFi so that this device has internet access.
- Select your home/office WiFi network.
- Enter your WiFi password.
- Click the "Connect" button.


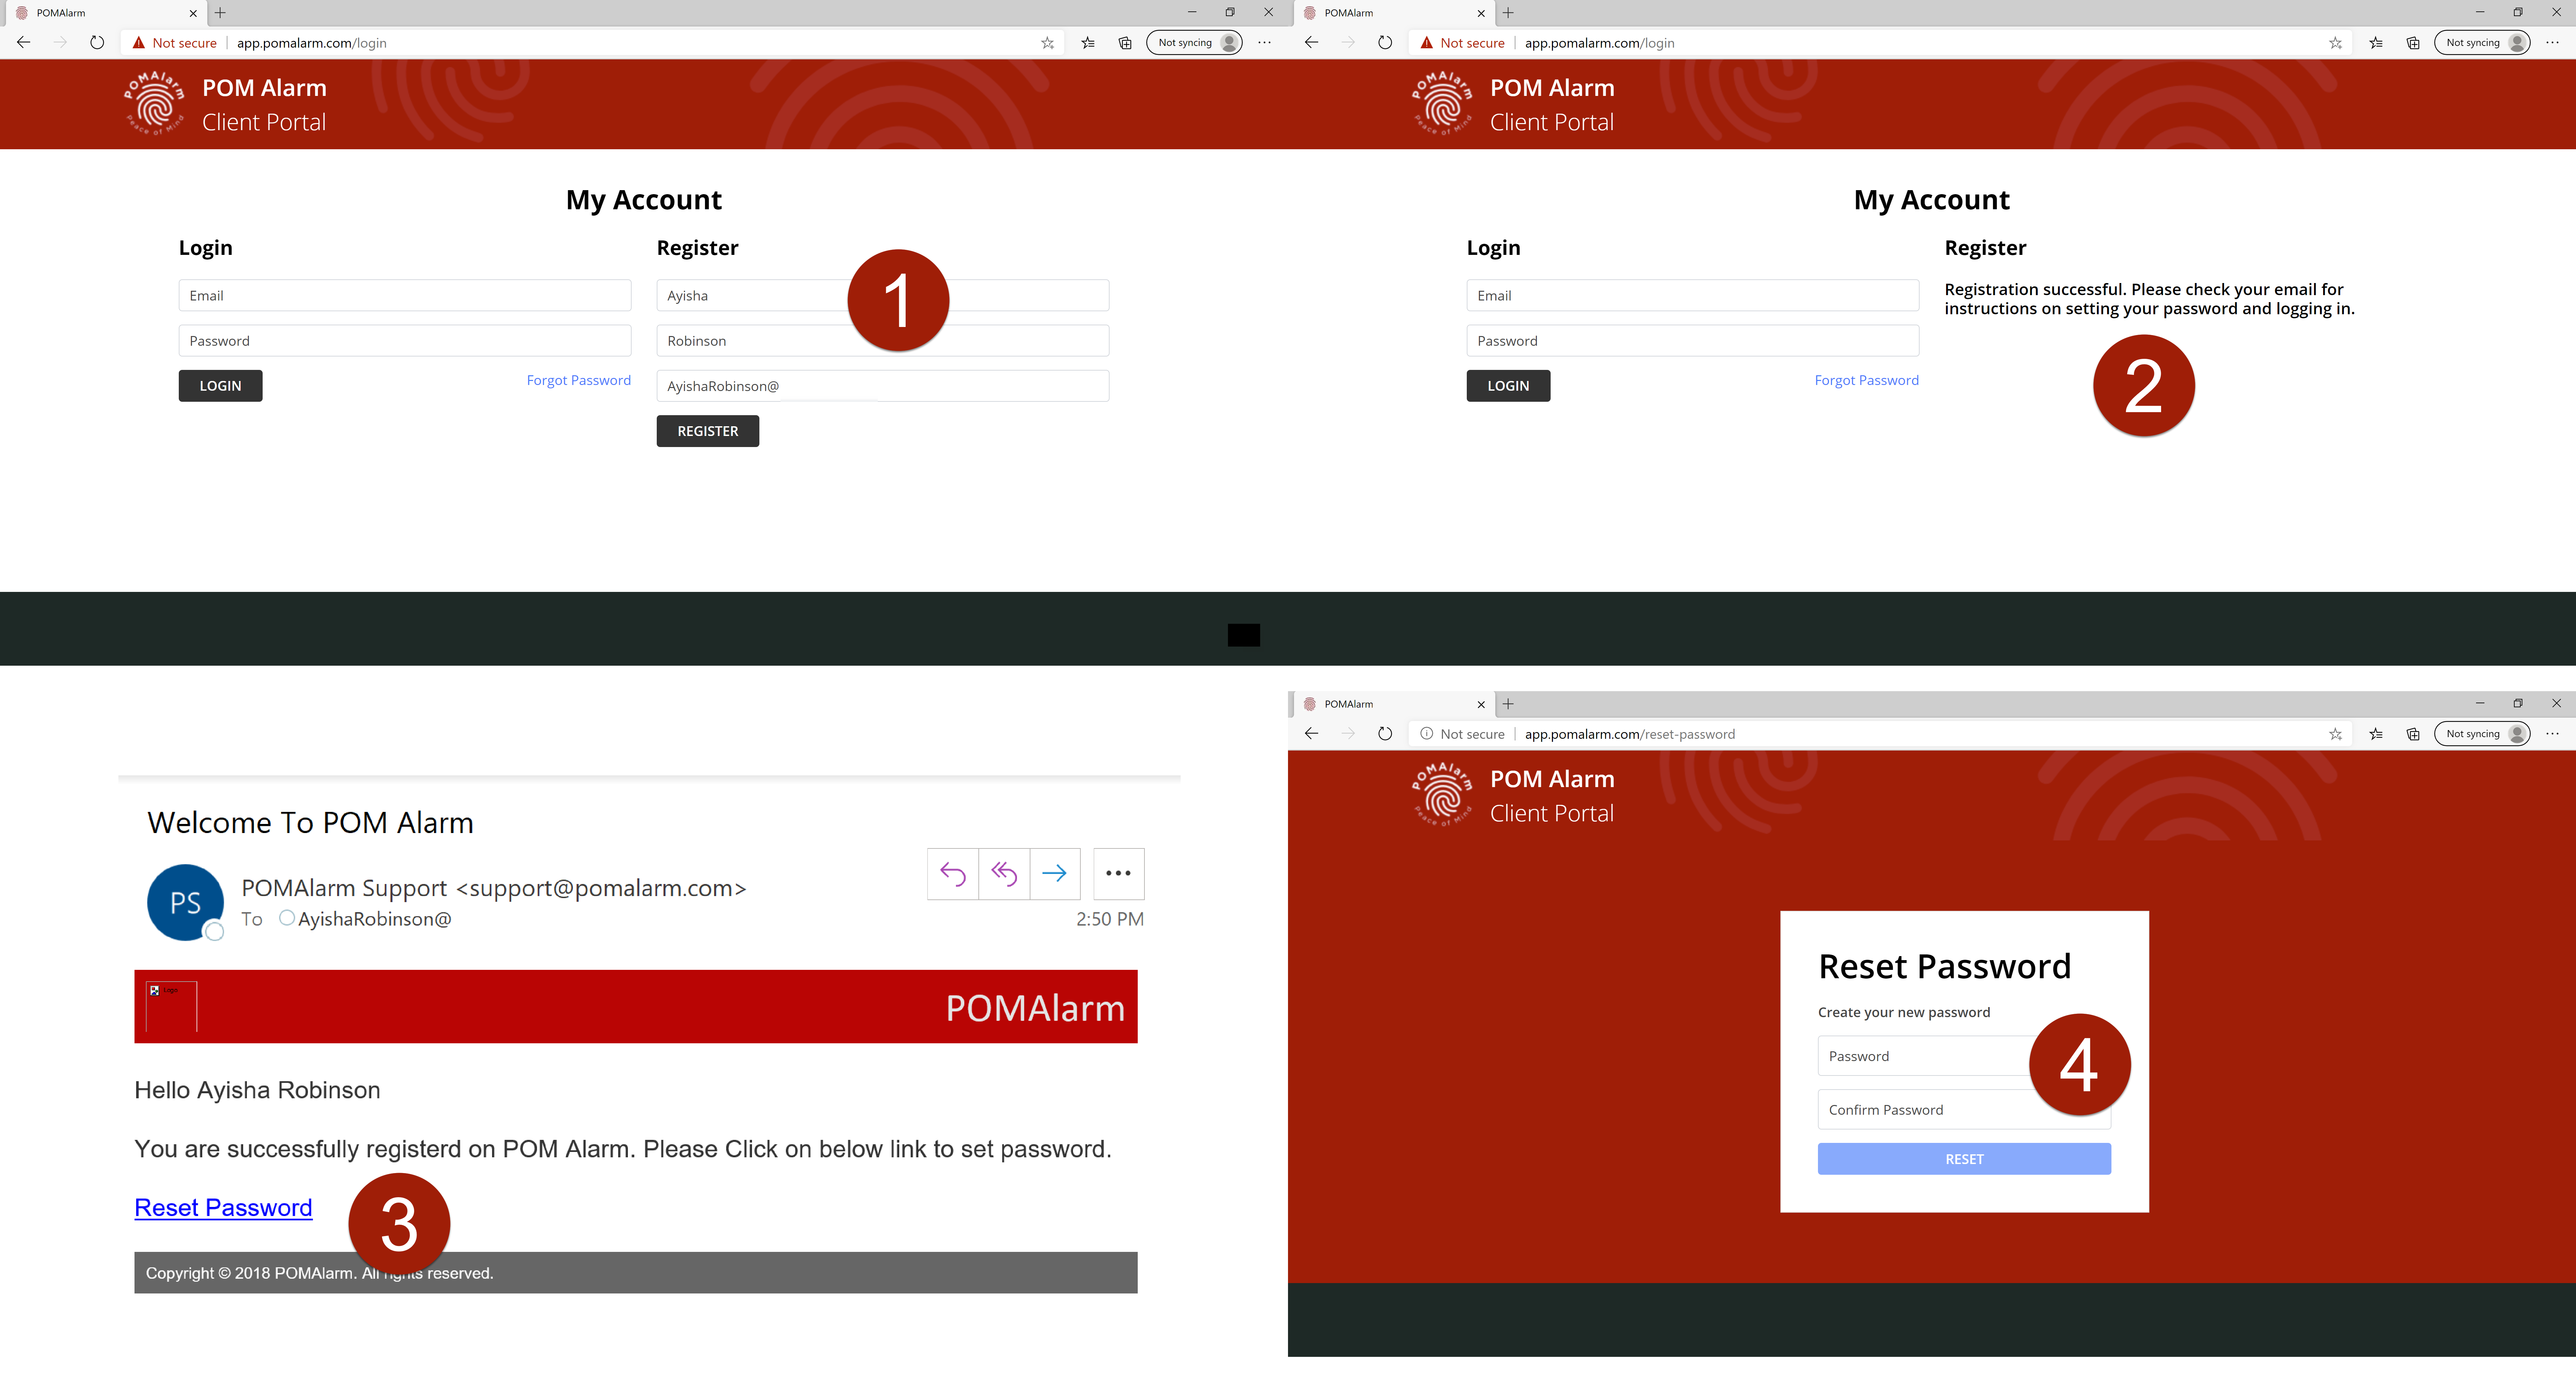
Creating your POMAlarm Portal Account
Now we will set up your POMAlarm Portal account in the POMAlarm system servers where you can manage your Devices, Contacts, and Quiet Rules.
- Confirm that this device is connected back to your home/office WiFi network and has internet access.
- Go to https://app.pomalarm.com/
- In the Register section, fill in your First Name, Last Name, and Email Address
- Click on the "Register" button
- You will be sent a welcome email that will include instructions on setting your password.
Note that you will not be able to log in until your password is set using the link in the welcome email.
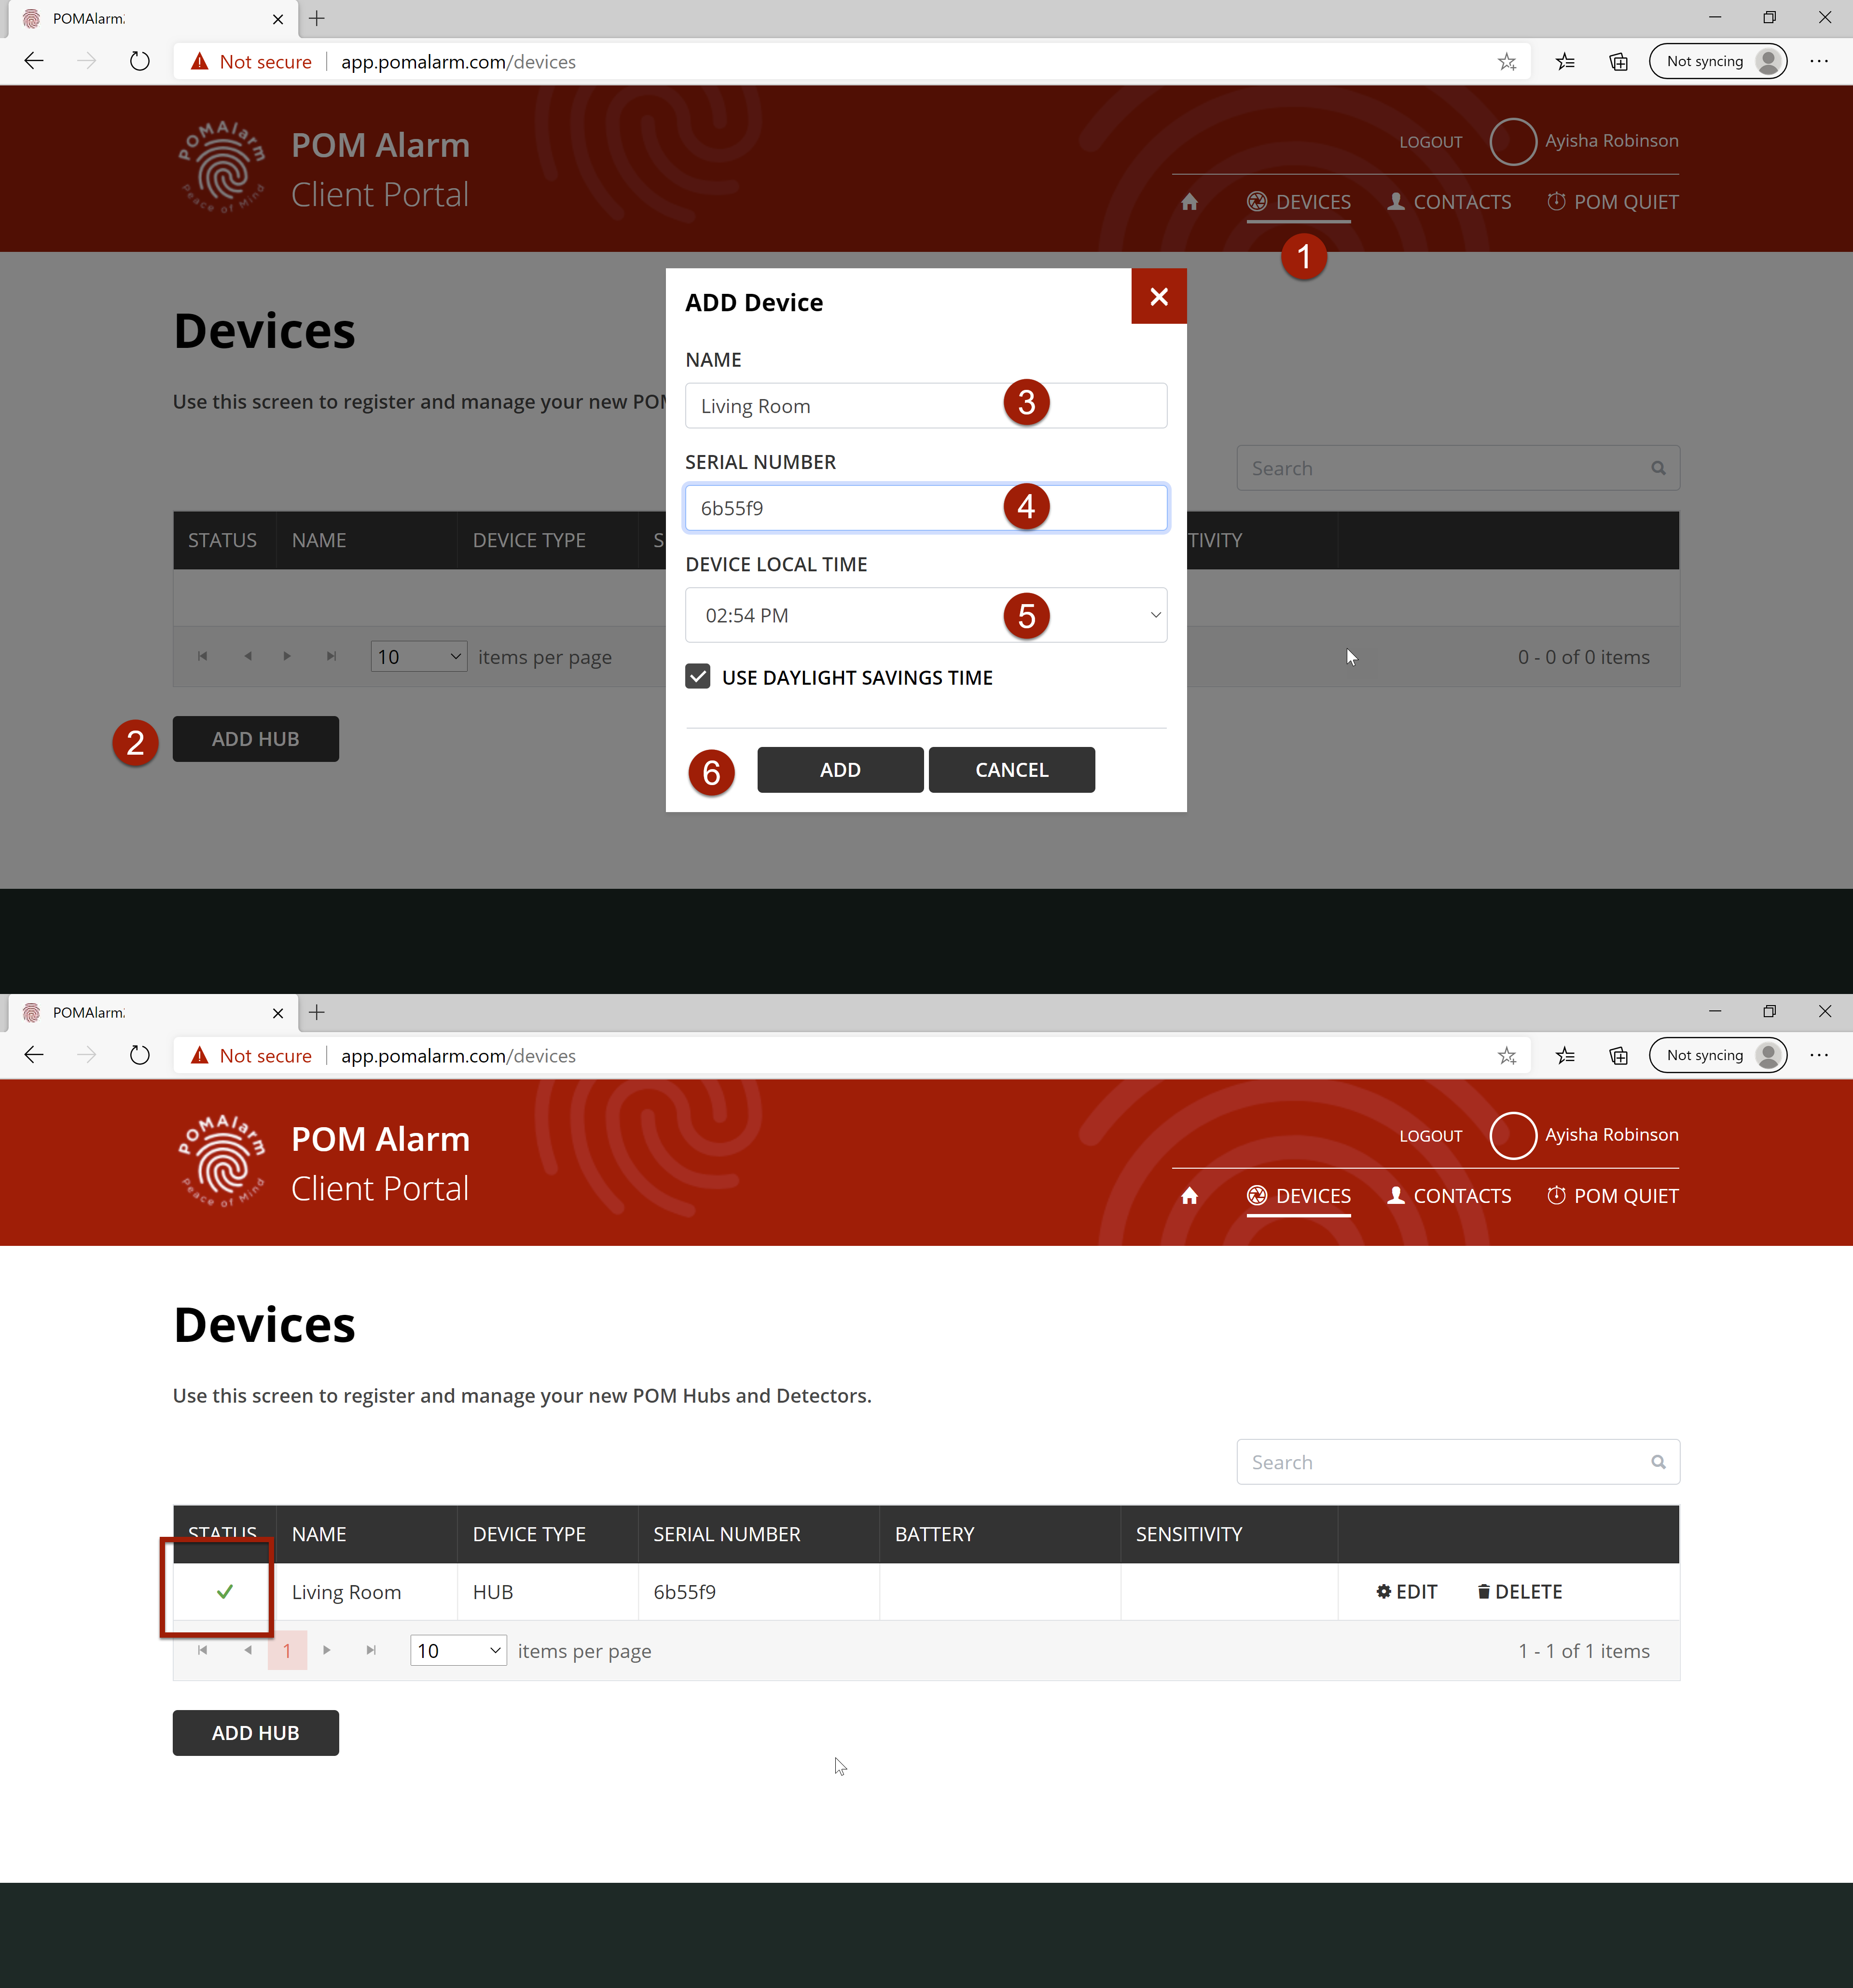
Registering Your POMAlarm Gateway Hub
In order to manage your devices, we need to register your specific Gateway Hub as belonging to you.
- If you are not already logged in, log into the Client Portal at https://app.pomalarm.com/ using your Email Address and Password.
- Click on "DEVICES" to manage your Gateway Hubs and Detector Pucks.
- Click the "ADD HUB" button
- Provide a name for your Hub (e.g. Living Room)
- Enter the 6 digit Gateway Hub serial number you recorded earlier:
- Confirm the time is correct for your location, and check the box next to "Use Daylight Savings Time" if you observe Daylight Savings Time in your area.
- Click the "ADD" button
- Once this Gateway Hub information is submitted, it is registered and will show on your list of devices.
- A red "X" will initially appear on the left side of the entry, until the Hub has completed it's registration. A green check mark will verify the Hub and POMAlarm servers are communicating.
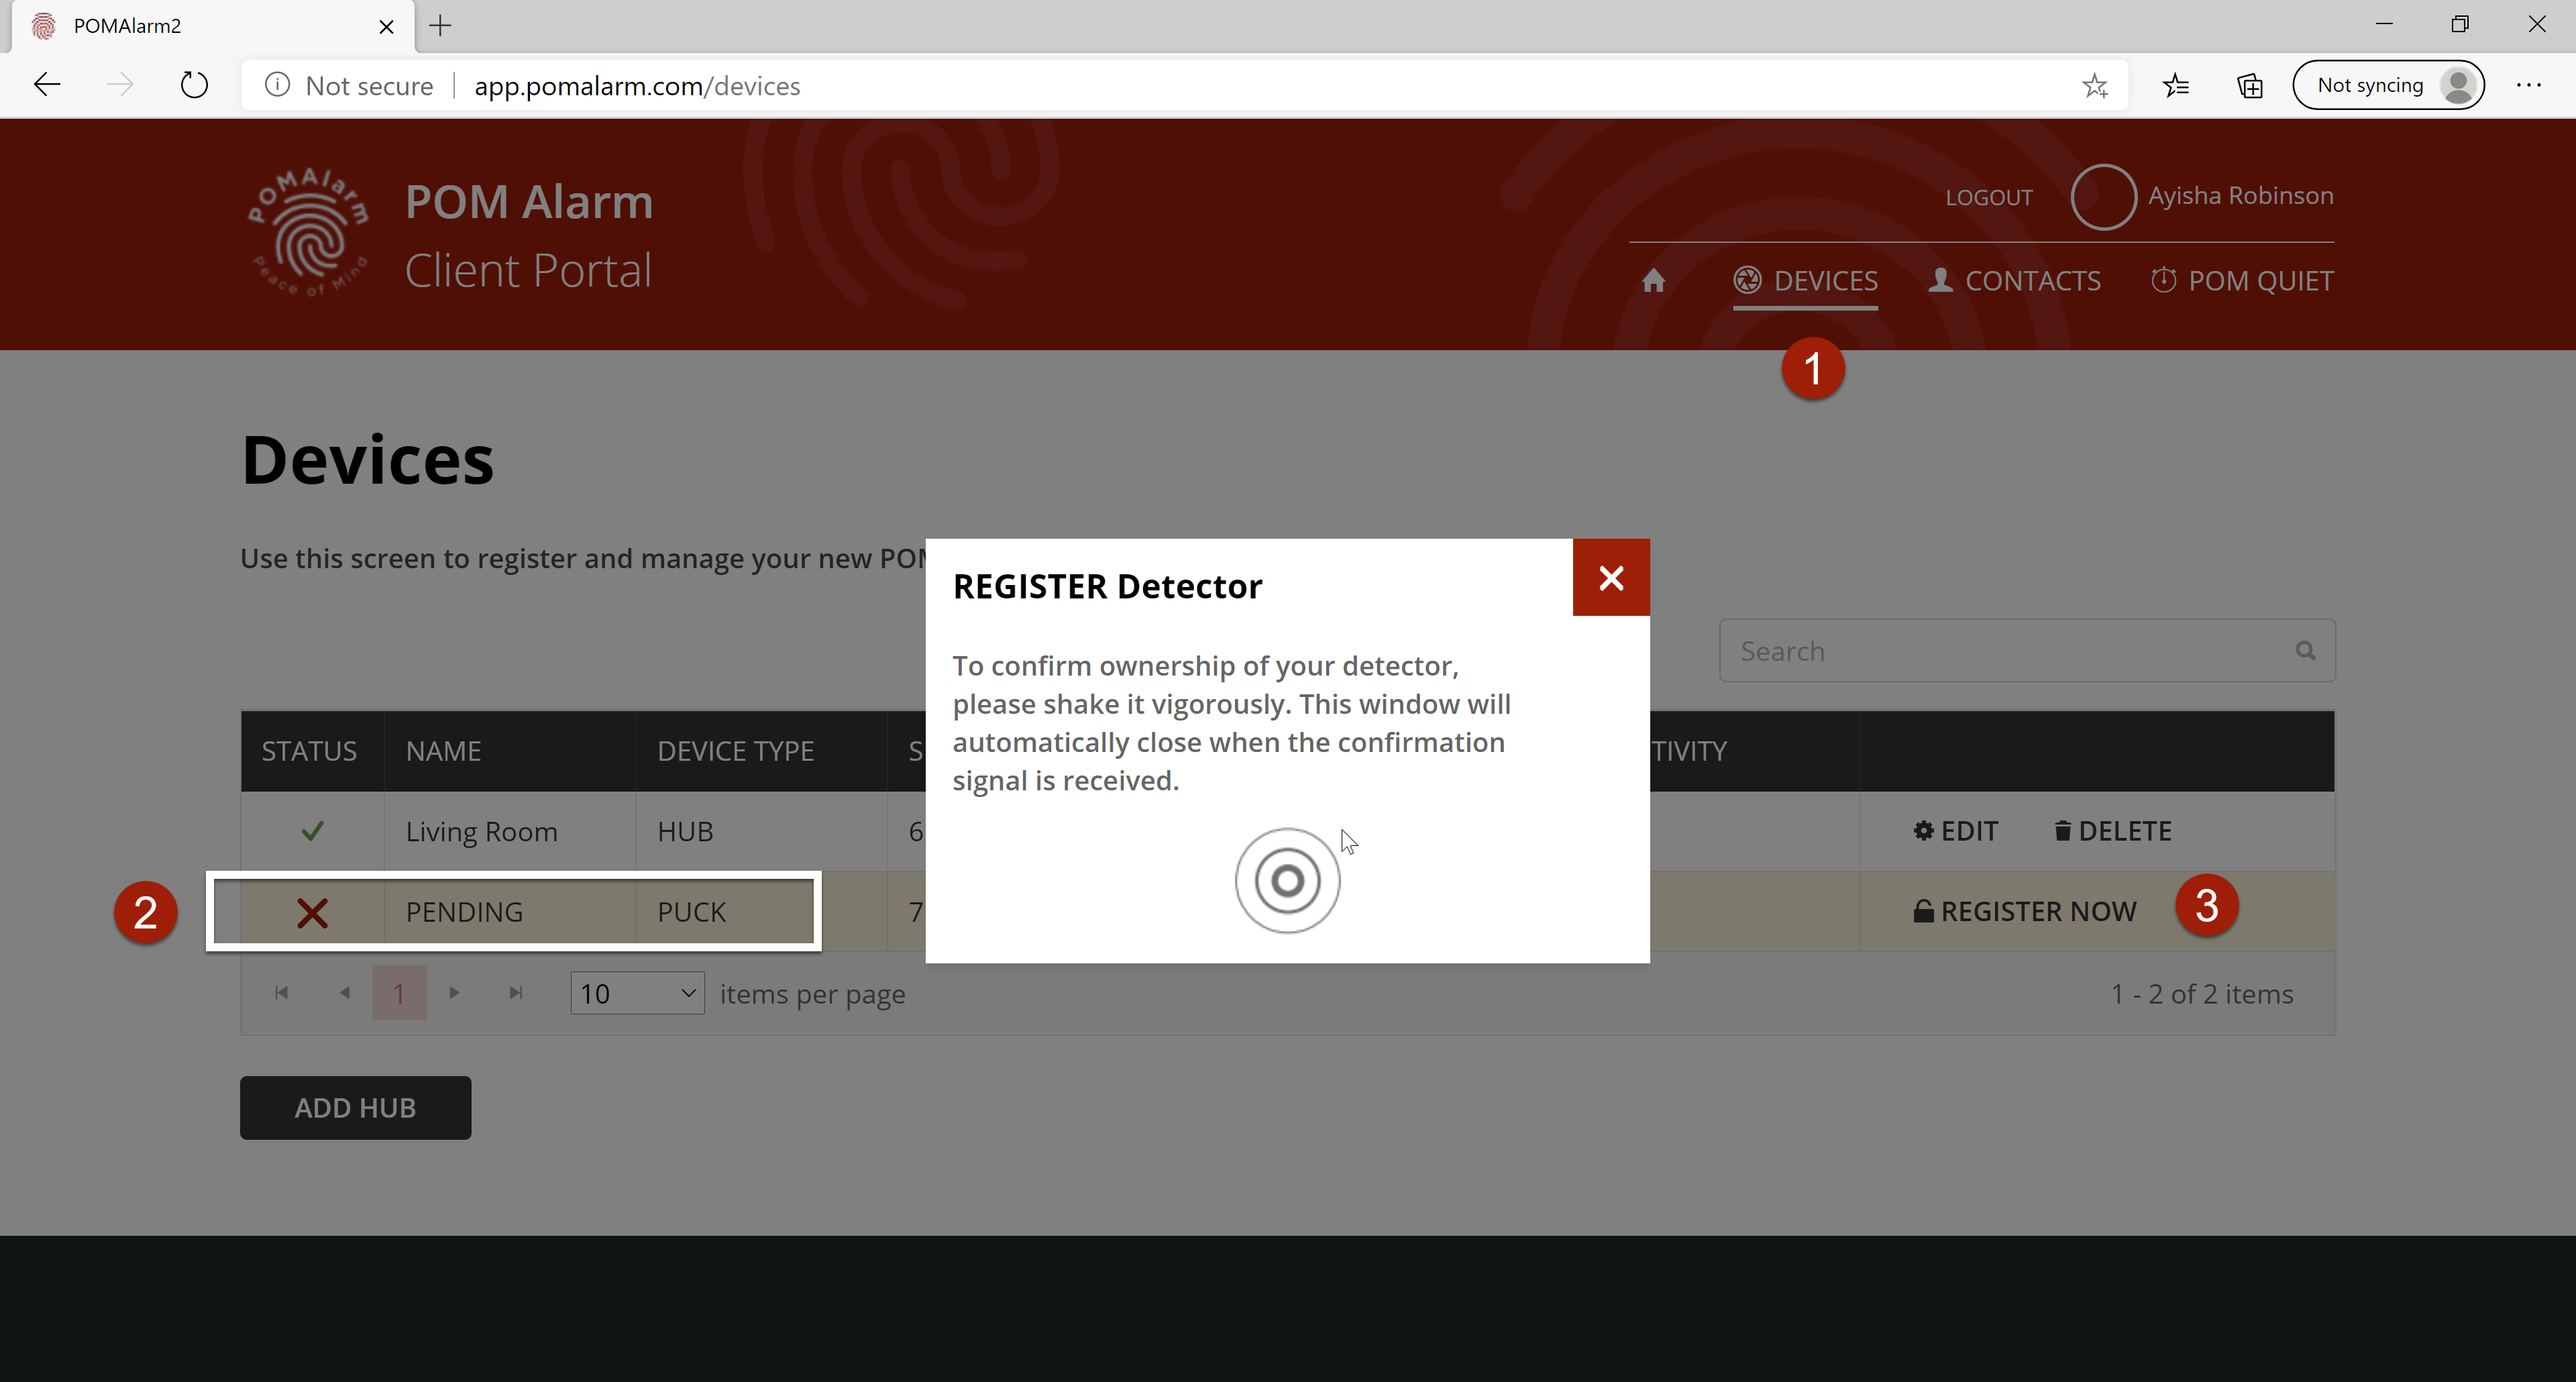
Registering Your POMAlarm Detector Puck
Please make sure that you Gateway Hub is communicating with the POMAlarm servers before registering your Detector Pucks. The Pucks communicate through your Gateway Hub and cannot be registered without an active connection.
- Pull the clear plastic strip from the slot on the round Detector Puck to activate its battery.
- Give the Detector Puck a tap. It will light up and the Gateway Hub will blink slowly acknowledging that it has received a signal from the Detector Puck.
- If you are not already logged in, log into the Client Portal at https://app.pomalarm.com/ using your Email Address and Password.
- Click on "DEVICES" to manage your Gateway Hubs and Detector Pucks.
- The Device Portal screen will show the new Detector Puck registration as "PENDING".
- Click on the "REGISTER NOW" button next to the new Puck.
- Tap your detector again to confirm ownership. In a minute or so, your screen will show a confirmation, and you will be able to give your detector a name. We recommend naming the detector according to where it will be used (e.g. "Jewelry Box" or "Bedside Gun Drawer" or "Liquor Cabinet").
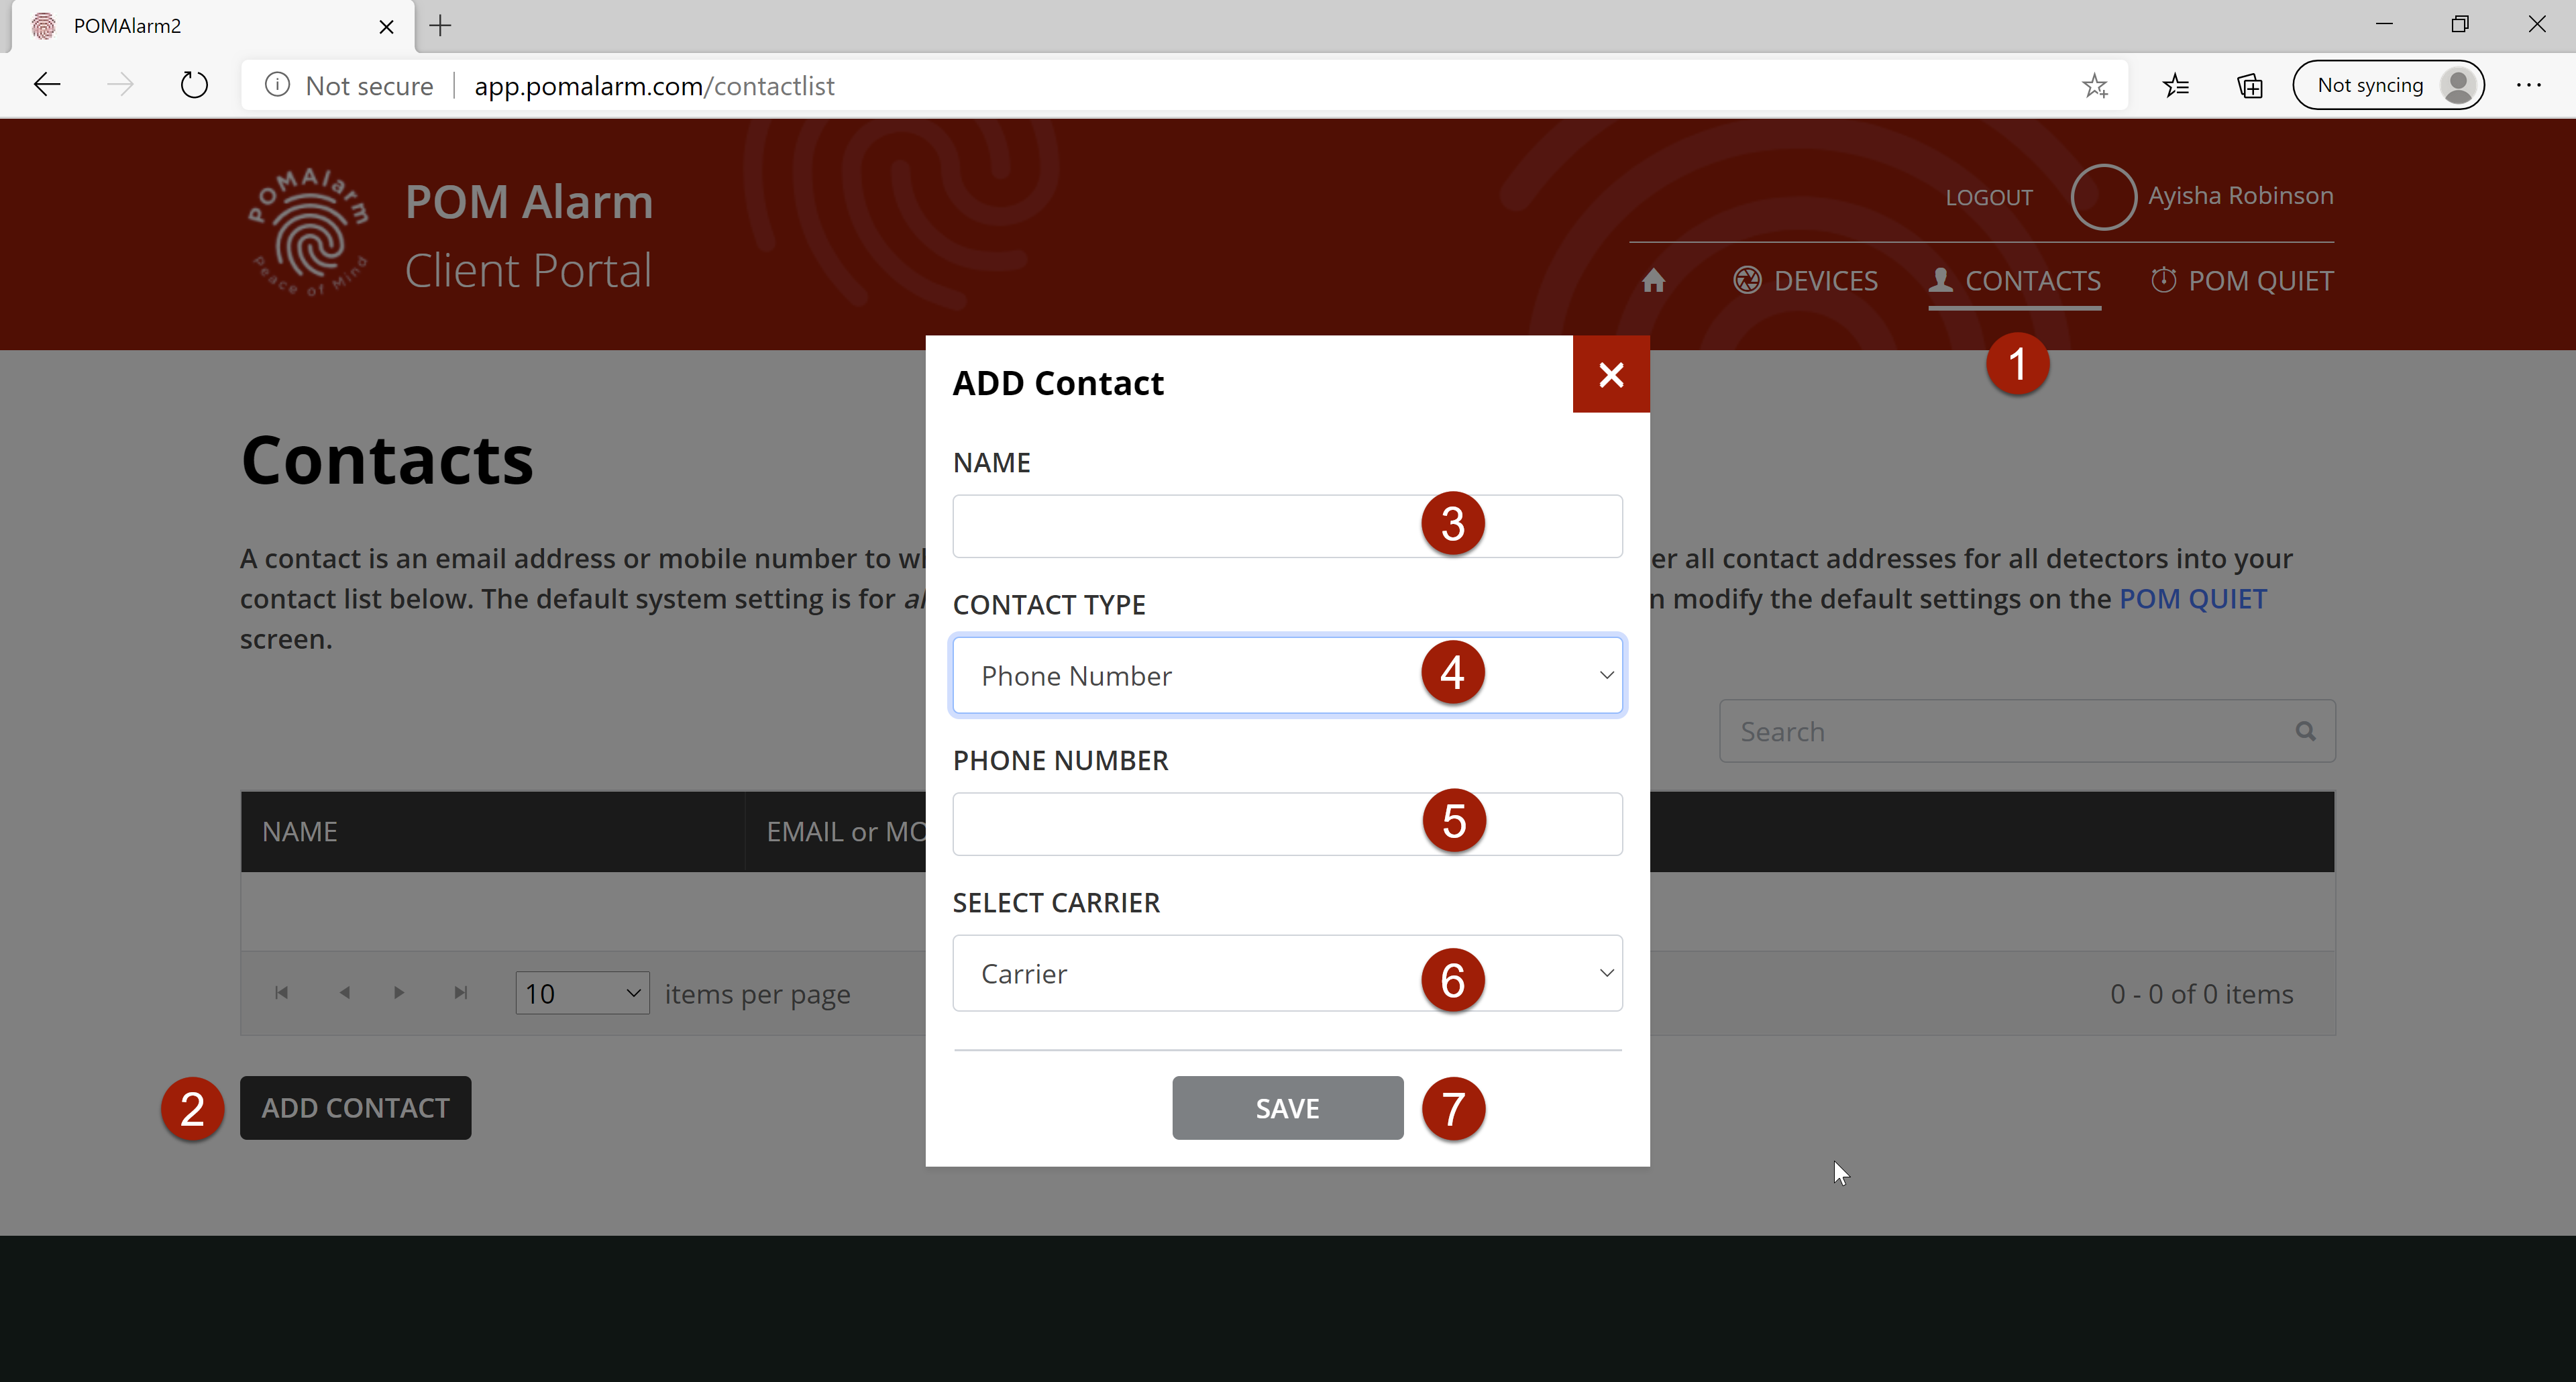
Setting Up Your Contact List
You can add multiple people to your contact list that you wish to be notified via email or a text message of a motion alert. Note that each 'contact' is ether an email address or phone number, however, you can set up multiple 'contacts' for the same person, one as an email and one as a phone text message.
- If you are not already logged in, log into the Client Portal at https://app.pomalarm.com/ using your Email Address and Password.
- Click on "CONTACTS" to manage your Contact list.
- Click on the "ADD CONTACT" button to add a new contact.
- Enter a name for this contact. (e.g. "John's iPhone").
- Select the Contact Type for this contact, either "Email" or "Phone Number"
- For an Email type contact, enter the email address.
- For a Phone Number type contact, enter the phone number and select the carrier.
- Once a Contact is added, it will appear on the Contacts list. You can change contacts any time.
Adjusting Your Detector Sensitivity Level (Optional)
You can adjust the sensitivity levels of each Detector Puck to balance between getting a motion alert and a false alarm. The Pucks come factory set to the best level for most uses, but you may adjust as necessary for your usage.
- If you are not already logged in, log into the Client Portal at https://app.pomalarm.com/ using your Email Address and Password.
- Click on "DEVICES" to manage your Gateway Hubs and Detector Pucks.
- To adjust the sensitivity level of the Detector Puck return to the right side of the Detector Puck row and click on Edit.
- Click on the buttons to set your Detector Pucks level of sensitivity, with the feather icon denoting higher sensitivity and the hammer icon denoting lower.
- Click on "UPDATE DETECTOR" button and wait for the download wheel to stop spinning.
- Pick up your detector puck, hold it sideways and wave it back and forth. You will see a solid light for 3 seconds, then blinking, then solid again for 5 seconds.
- When the detector puck light goes out, it has the new sensitivity level.

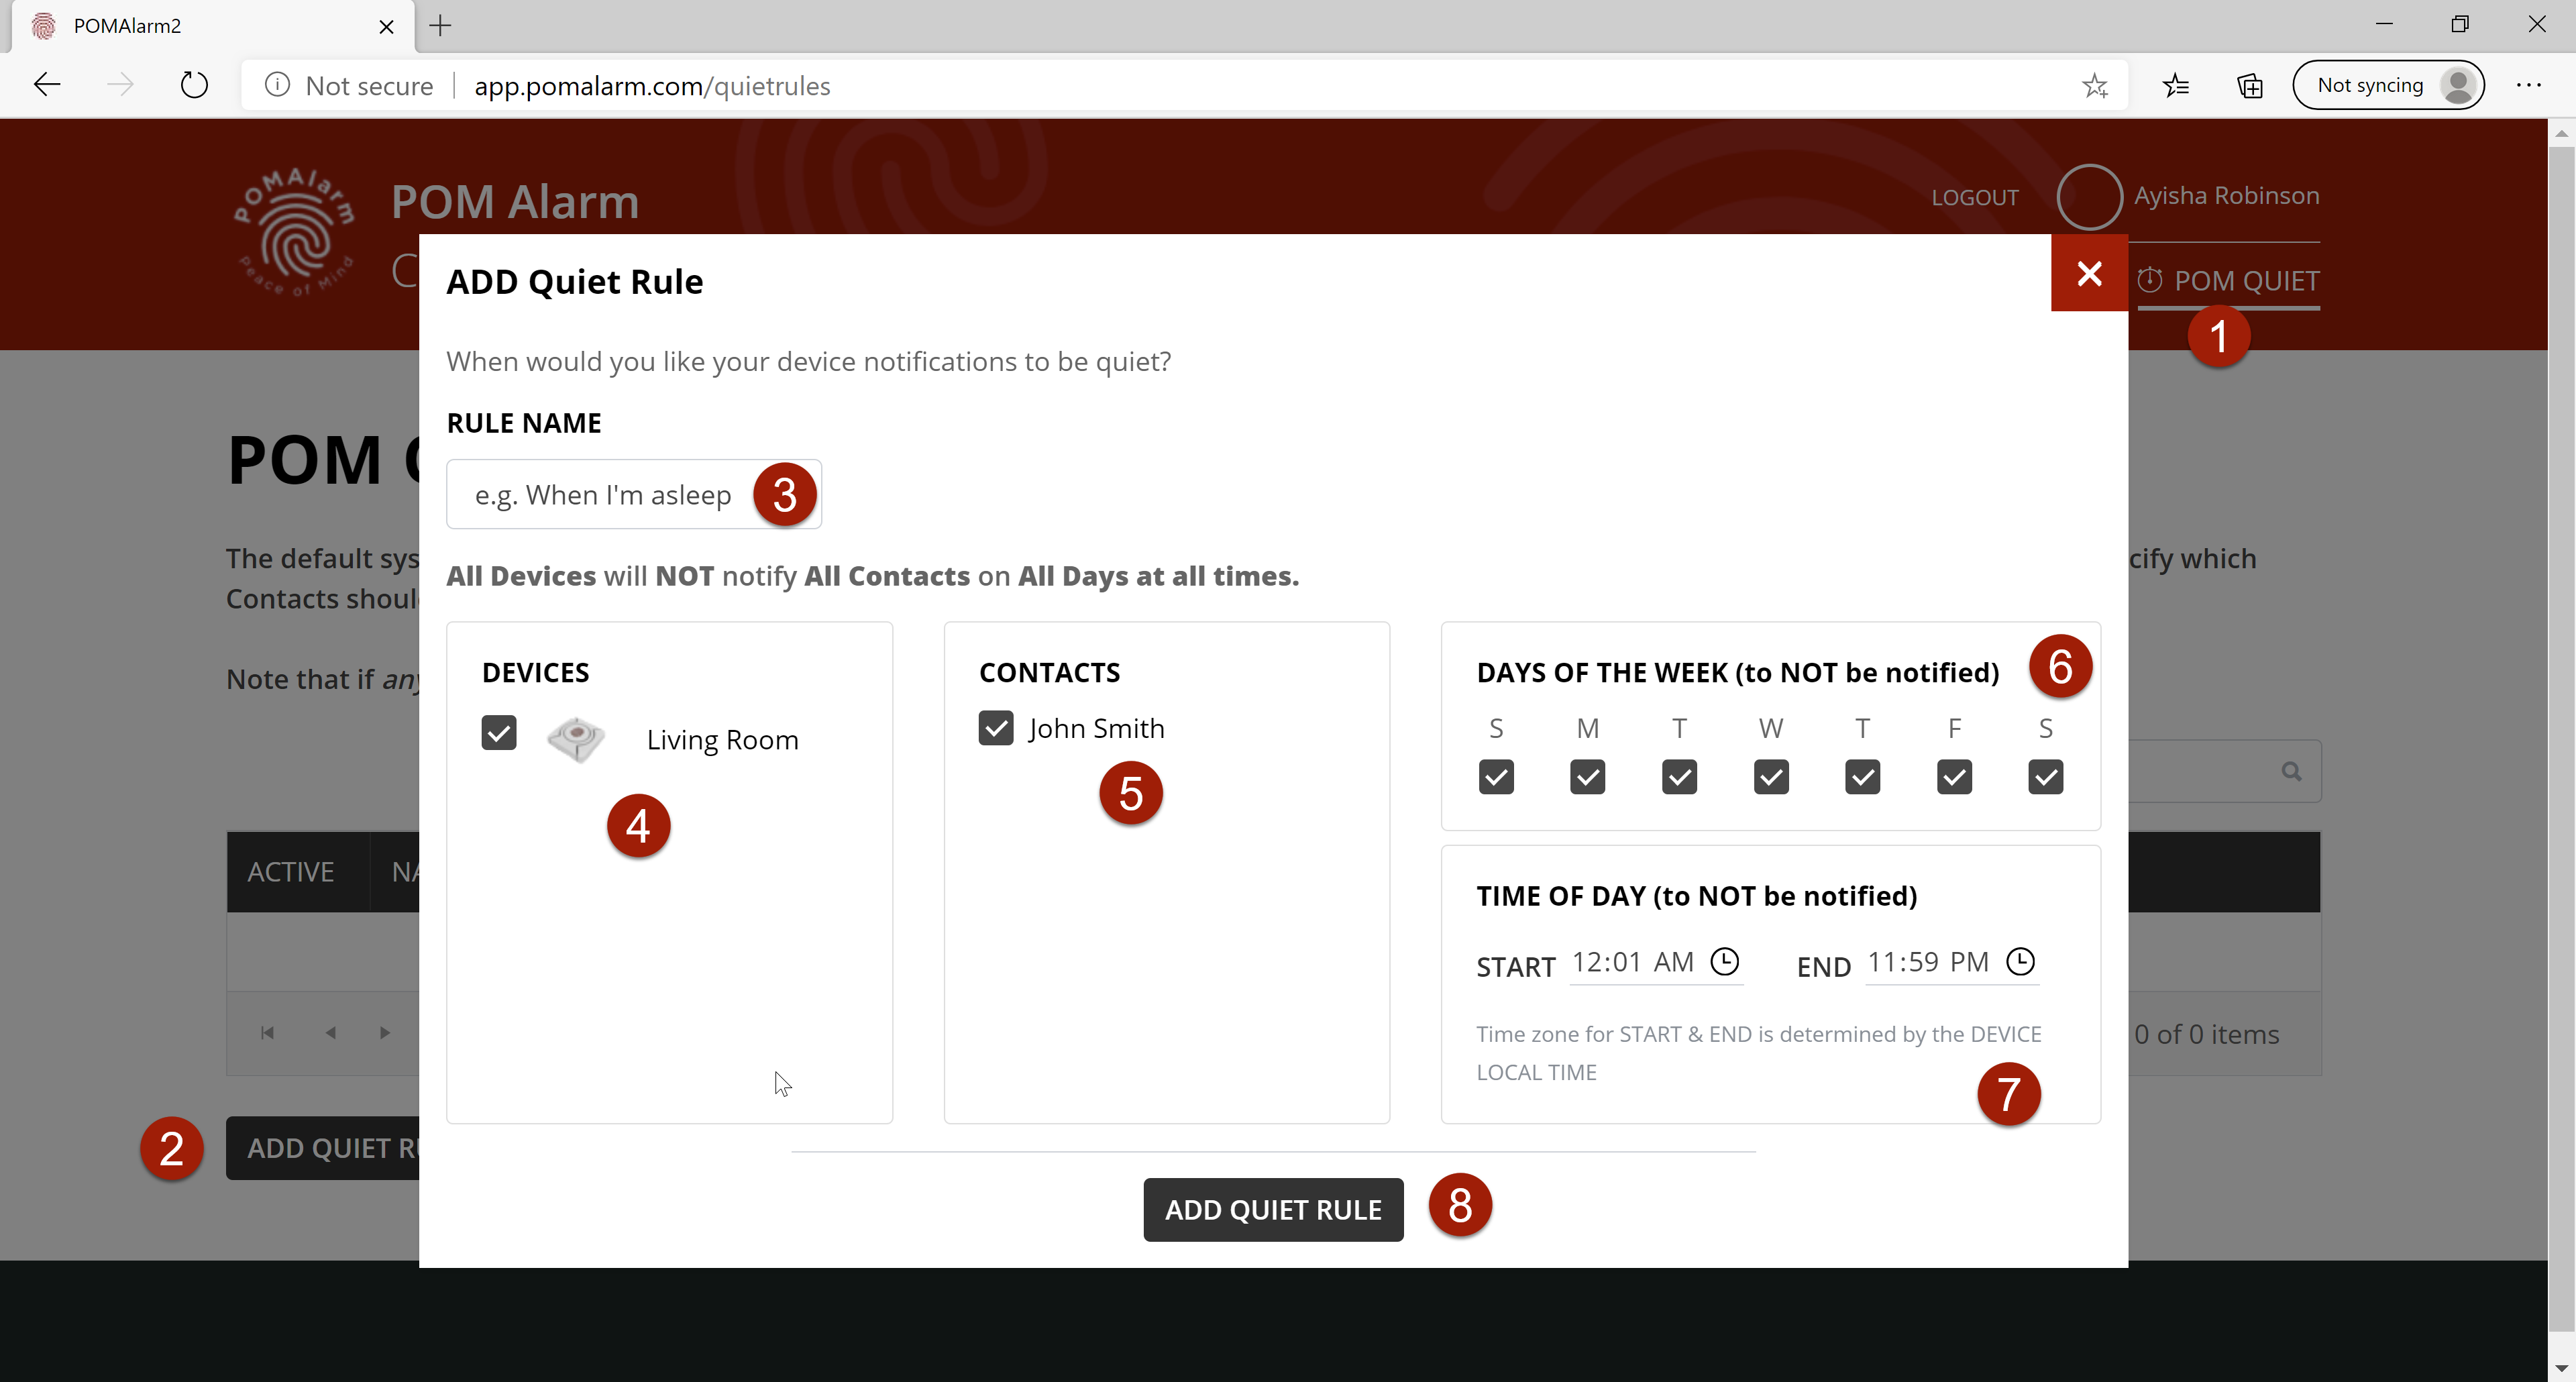
Setting Up Your Quiet Time Rules (Optional)
By default, your Detector Pucks will notify all contacts any time a motion is detected. Quiet time rules allow you to deactivate these alerts during various times of the week and day. You can set different Quiet Times for different Detector Pucks, Contacts, Days, and Times.
- If you are not already logged in, log into the Client Portal at https://app.pomalarm.com/ using your Email Address and Password.
- Click on "POM QUIET" to manage your Quiet Times.
- Click on the "ADD QUIET RULE" button to add a new rule.
- Enter a rule name that descibes the rule. (e.g. "When I am asleep")
- Select the DEVICES(s) that you want to keep silent.
- Select the CONTACT(s) that you want to remain unbothered.
- Select the DAYS OF THE WEEK that you want the rule to be in effect.
- Select the TIME OF DAY that you want the rule to be in effect.
- Click the "ADD QUIET RULE" button to save the rule.
- Once a Quiet Rule is added, it will appear on the POM Quiet list. You can change rules at any time.
Thank You!
You are now all set to place your Detector Puck(s) throughout your home or office.
The Gateway Hub can retrieve signals from up to ten Detector Pucks so please go to www.pomalarm.com should you desire to purchase more.
Thank you for purchasing your POMAlarm and enjoy Peace Of Mind�.
Contact Support@POMAlarm.com for any comments or questions.
Troubleshooting
If your Gateway Hub fails to connect to WiFi, it will again sound three long beeps, plus some number of short beeps depending on the error mode:
- 1 beep: No WiFi profiles stored
- 2 beeps: WiFi network name not found
- 3 beeps: Incorrect password
- 4 beeps: Weak WiFi signal
- 5 beeps: WiFi connected, but no IP address acquired
- 6 beeps: Unknown error
If the error code is 1, 2, or 3 short beeps, repeat the previous "Connecting the Gateway Hub to the Internet" steps, and make sure the user name and password are correct (sometimes an extra space is falsely added to the end of these fields). If the error code is 4 beeps, move closer to your WiFi router and reboot the Hub again.
If the error code is 5 or 6 beeps occurs try connecting to an alternative WiFi network. If that fails, please contact Support@POMAlarm.com